
Browse the guide
Recurring billing & subscriptions
Bill on a schedule; the system chases the card so you don't.
Recurring billing charges a customer's saved card or bank account the same amount on a schedule, or emails a bill each period for them to pay. Plans and usage meters let you reuse prices and charge by usage. Failed cards are retried for you.
Memberships, maintenance contracts, retainers, rent, installment agreements and software subscriptions.
- Your billing tools are active on your account.
- The customer in your directory with an email, or you add them on the form.
- A card or bank account on file for the customer, or you add one on the form. Bank accounts need bank payments on your account.
On this page
Set up billing
Charge a card or bank on a schedule, or email a bill each period.
Set up a recurring plan
A recurring schedule charges a customer the same amount on a repeating cycle and emails them a receipt each time. Use it for memberships, maintenance contracts, retainers, rent, payment plans, or any service billed by the week, month, quarter, or year.
- 1Go to Accept Payments → Recurring and click New schedule.
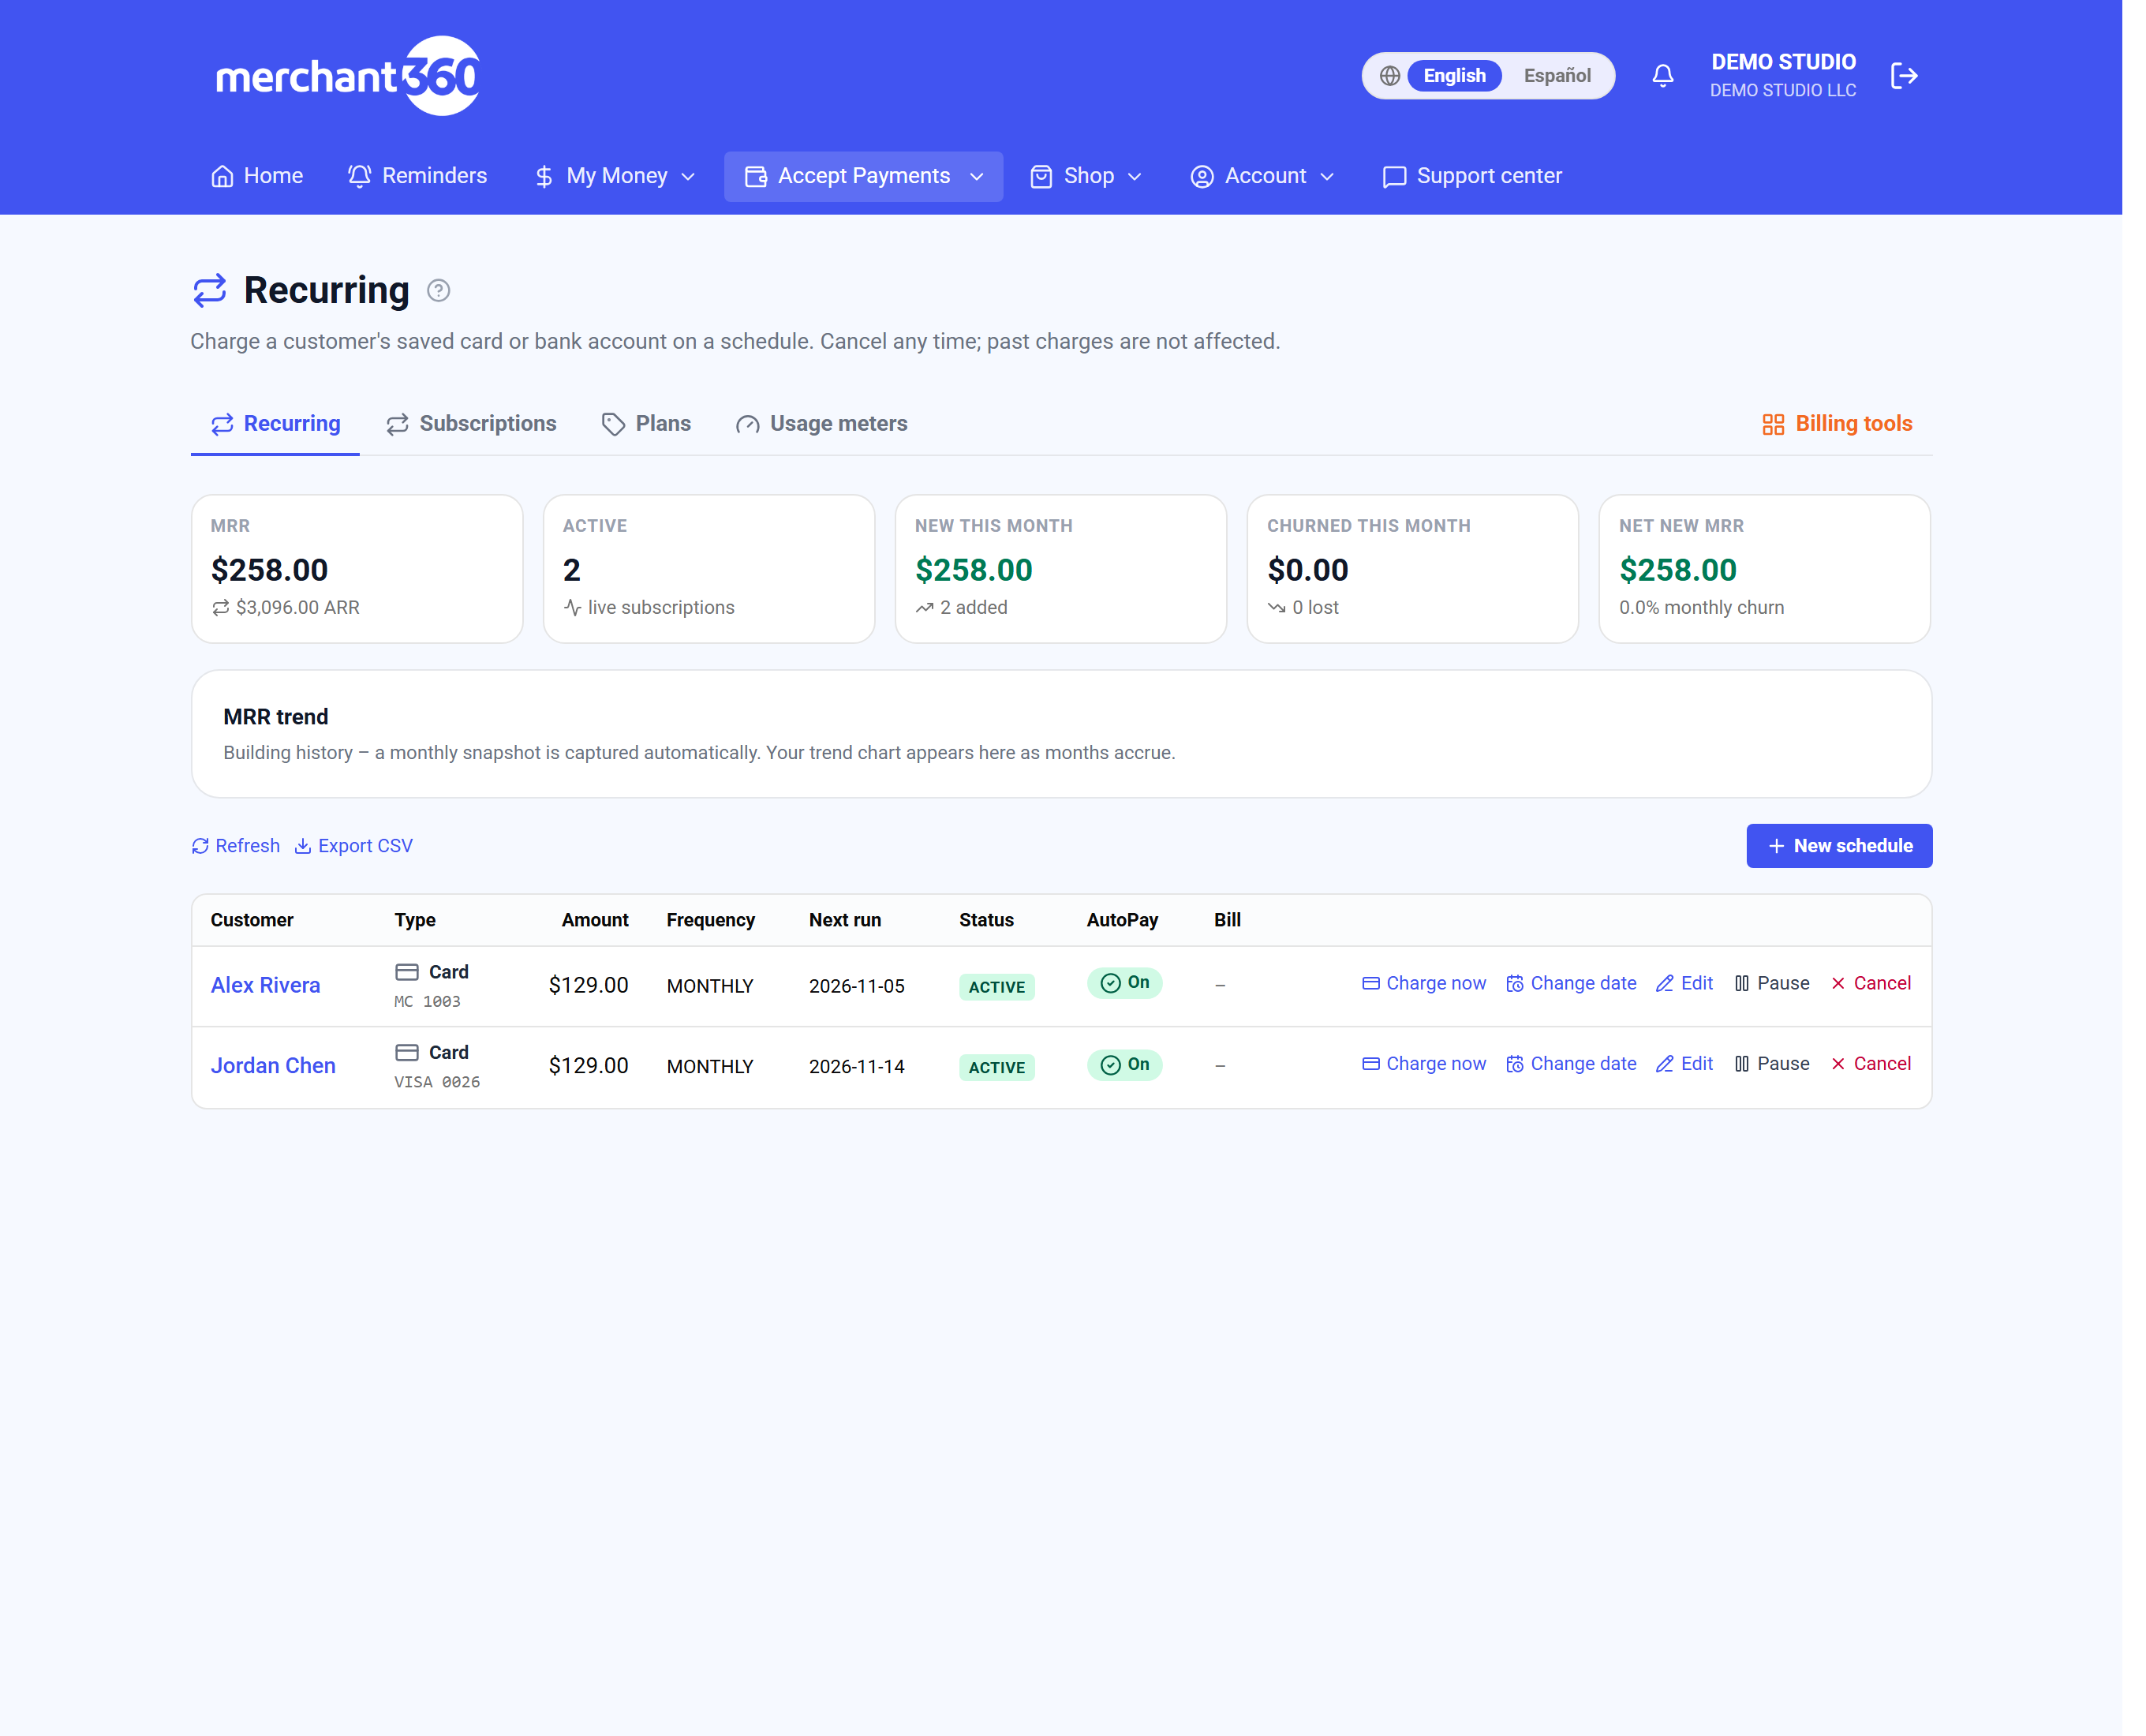
Accept Payments → Recurring. - 2Pick the customer, or press New customer, fill in the details and press Save customer.
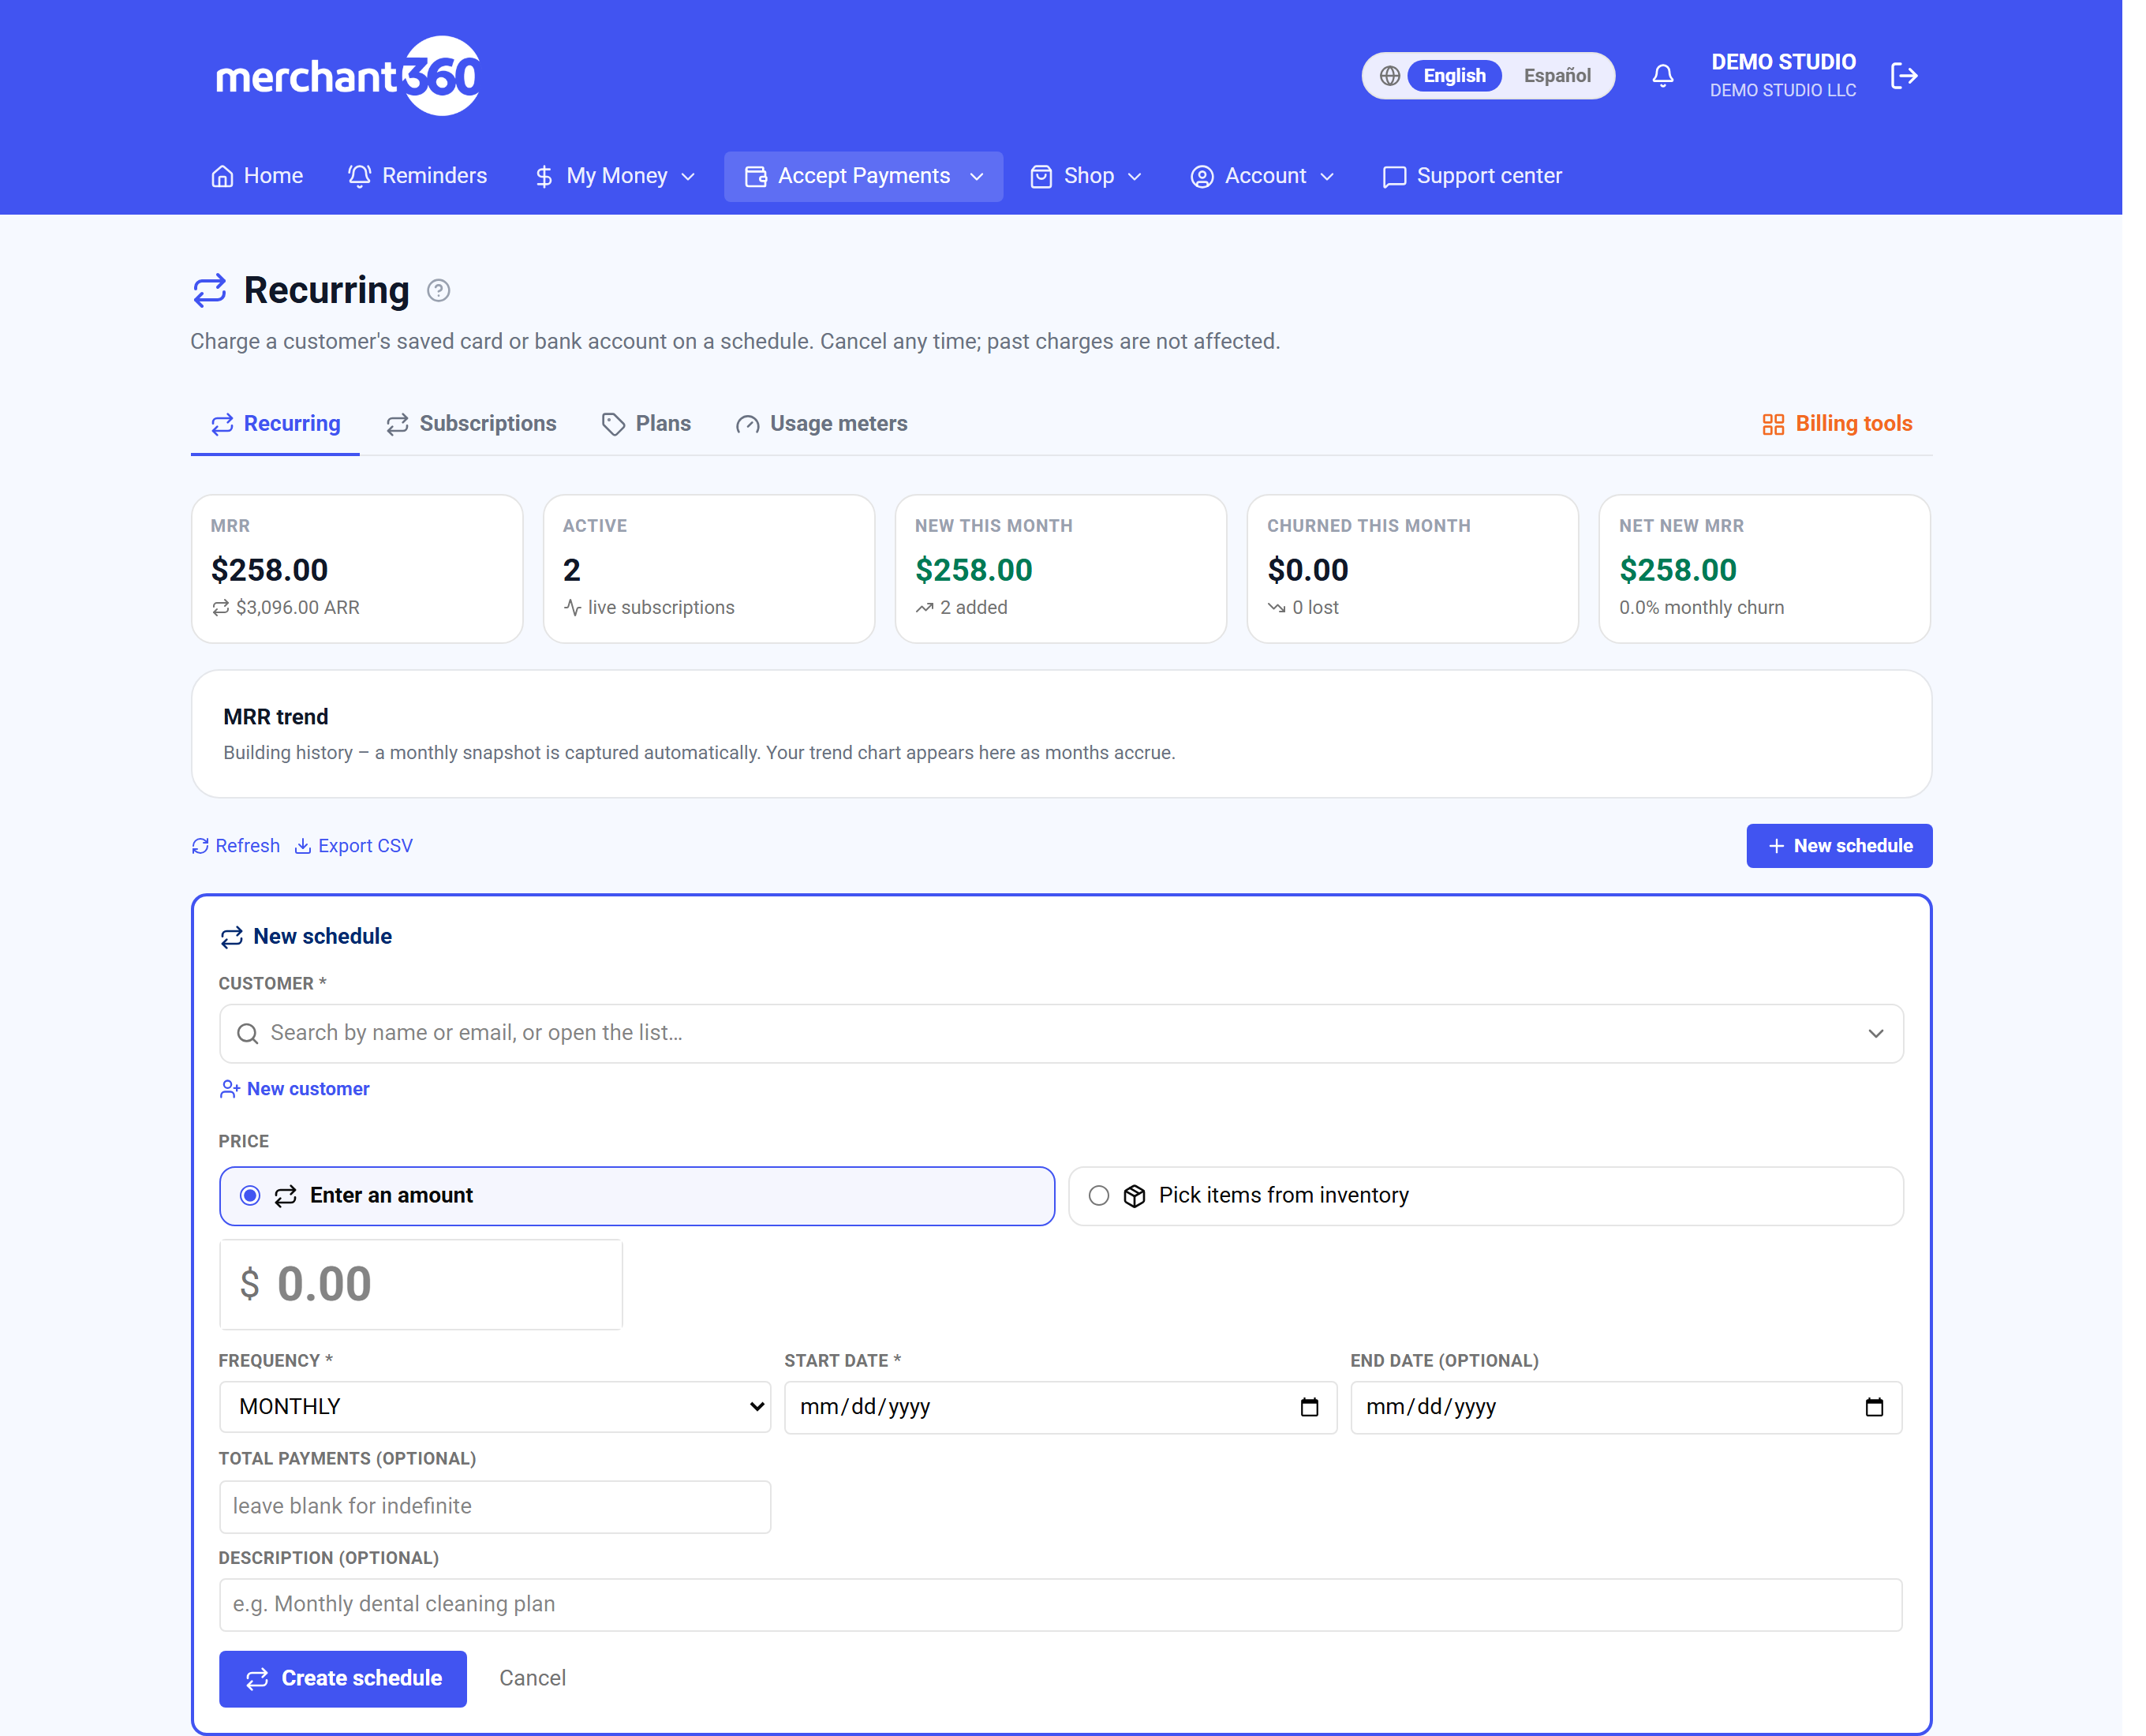
New schedule: pick the customer first. - 3Under Bill to, pick the card or bank account. None on file? Press Add a card or Add a bank account and save it.
- 4To split, tick Split between payment methods, tick each card or bank and type each share so the total is 100%.
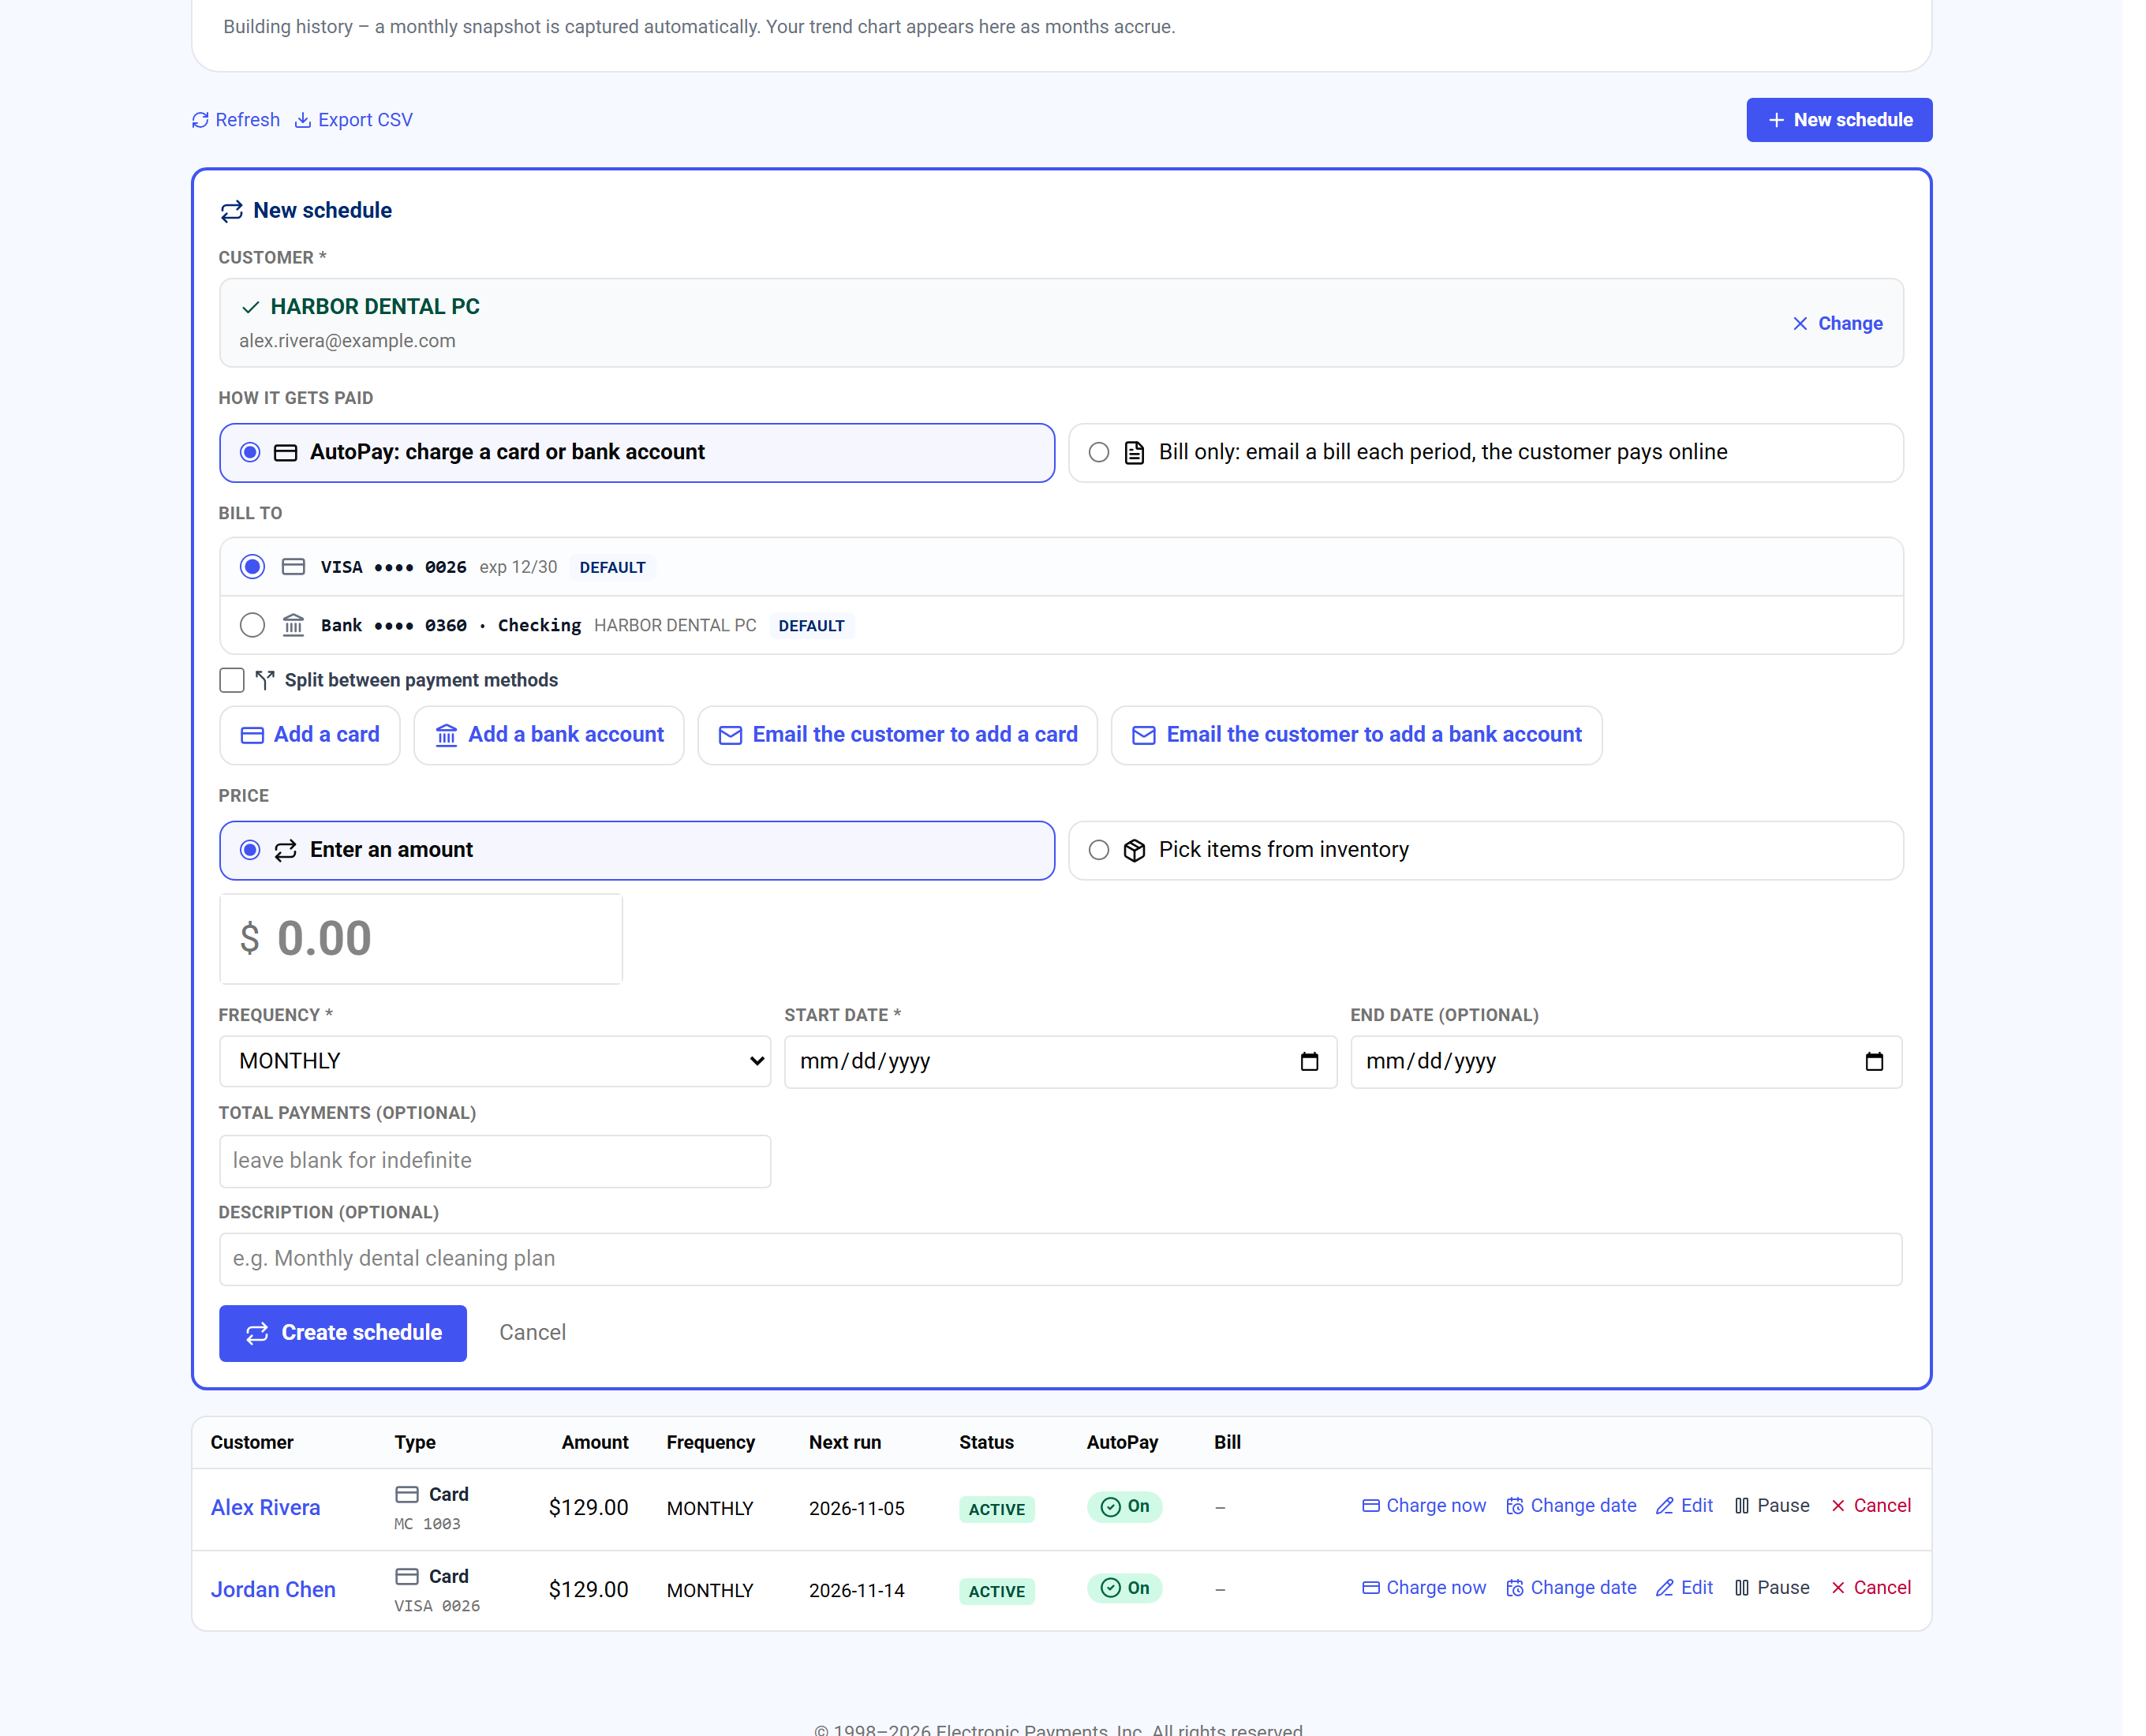
AutoPay: pick a card or bank, add one, or email the customer. - 5For a bank account with no authorization on file, tick I have the customer's signed bank authorization, or leave it so the customer is emailed to approve.
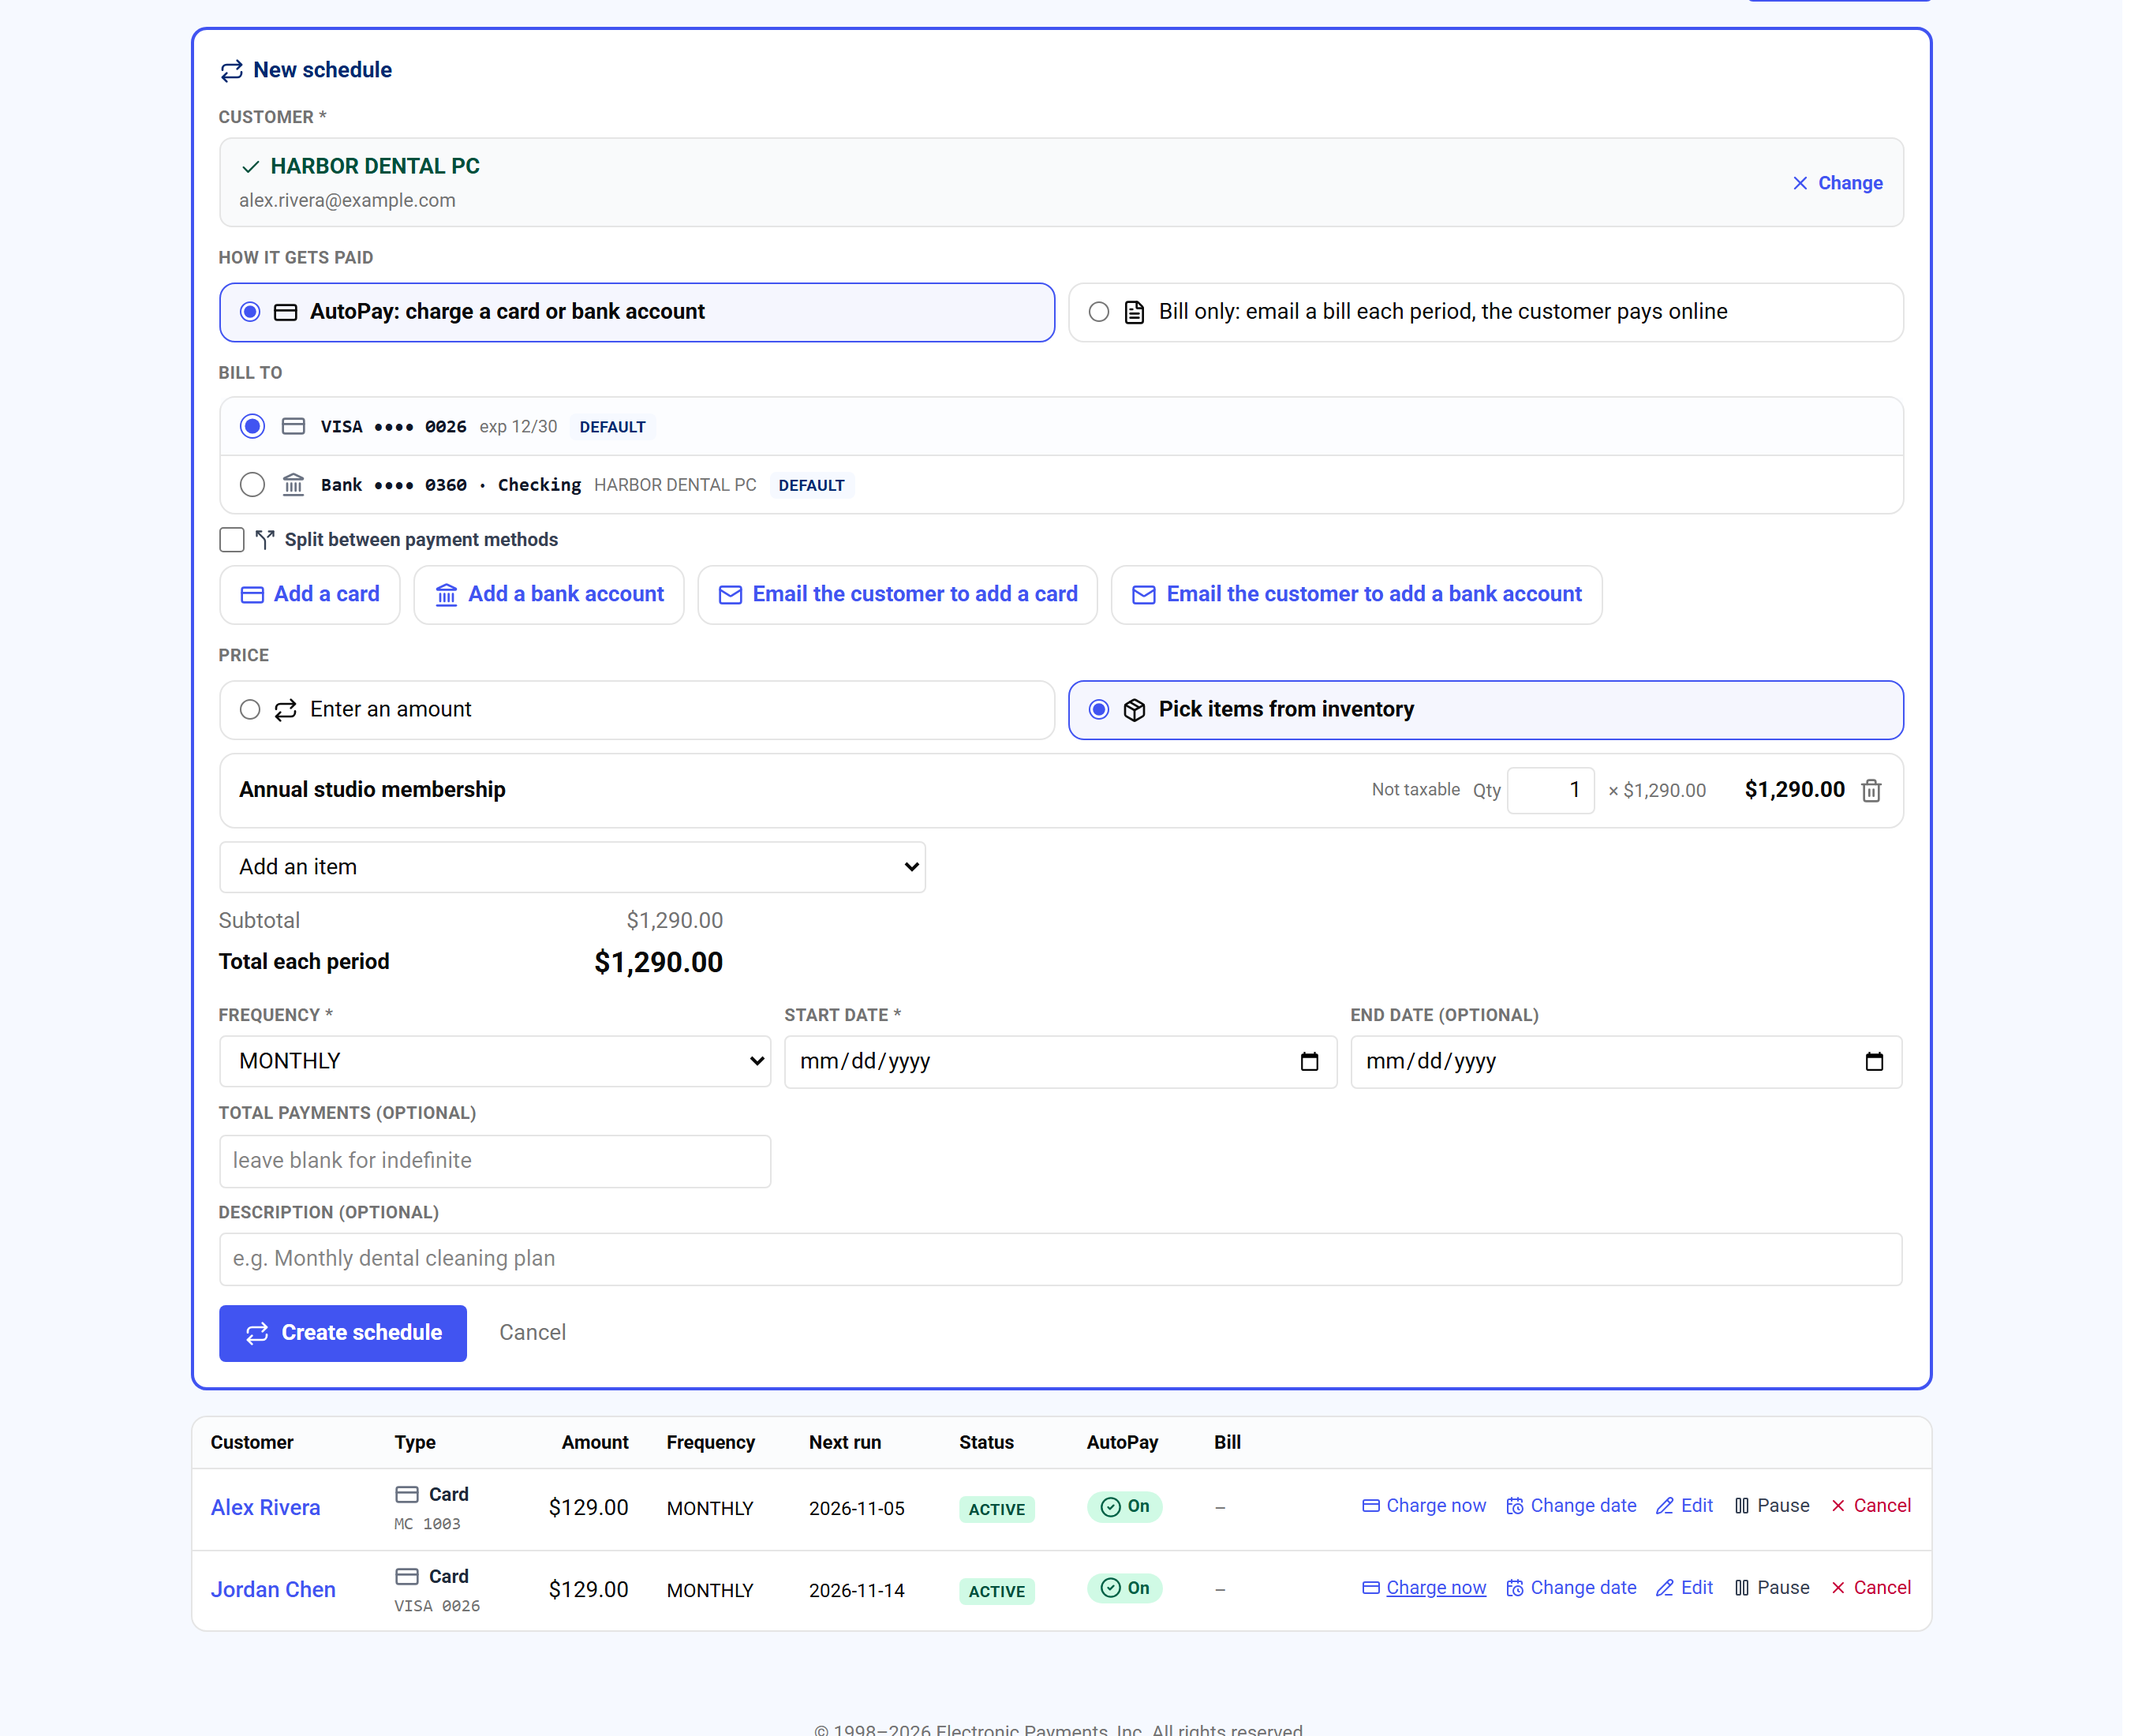
Price the plan from inventory items. - 6Enter the amount and the frequency: weekly, biweekly, monthly, quarterly, or annual. Set a start date, and optionally an end date or a total number of payments. Add a description.
- 7Click Create schedule.
Everything is on one form. No customer is filled in for you: pick one, or press New customer and type the name, email, phone, street and ZIP, then Save customer. Under Bill to the form lists the customer's cards and bank accounts on file, with the default picked. A customer with nothing on file gets Add a card and Add a bank account right there: the card is saved with no charge (the street and ZIP are sent for AVS), and the bank account is saved with the usual $0 validation. What you add is picked as soon as it is saved.
Split between payment methods bills one schedule to several cards or bank accounts by share, for example two parents paying 50% each toward braces. Tick it, tick each card or bank, and type each share; they must add up to 100% (Total shows in green when they do). Each share becomes its own schedule on the board with Split and its percent, and runs on its own: its own card or bank, its own retries, its own receipt. If one parent's card declines, the other parent's share is still collected.
A bank account needs the customer's authorization. One already on file is reused. Otherwise tick I have the customer's signed bank authorization (over $1,000.00 per debit, attach the signed form on the bank account under ACH authorizations first), or leave it unticked and the customer is emailed to approve; that share starts once they do. With no bank on file you can also choose Or email the customer to add and approve their own bank account.
Done looks like this: the board shows the schedule (one row per share for a split) with its Customer, Amount, Frequency, Next run date, and Status of Active, or Awaiting bank authorization for a bank share waiting on the customer. If the schedule shows Past due after a run, the card declined; see When a card fails.
| On this screen | What it does |
|---|---|
| New schedule | Opens the form. No customer is preselected. |
| Customer * | Search or open the list of saved customers. |
| New customer | Name, Email, Phone, Street address, ZIP, then Save customer. The new customer is picked. |
| Bill to | The customer's cards and bank accounts on file; the default is picked. Default and authorization on file are marked. |
| Add a card / Add a bank account | Saves a card (no charge) or a bank account (with a $0 validation) to the customer and picks it. |
| Split between payment methods | Bill several cards or bank accounts by share. Each share in %; Total must read 100%. Creates one schedule per share. |
| I have the customer's signed bank authorization | Shown for a bank account with no authorization on file. Records the signed form so the share starts on its date. Unticked, the customer is emailed to approve. |
| Or email the customer to add and approve their own bank account | With no bank on file: the customer gets an email, adds their bank and signs; the plan starts once they do. |
| Amount * | The charge per cycle (the whole amount when split; each share is that amount times its percent, the last share takes the rounding cent). |
| Frequency * | DAILY, WEEKLY, BIWEEKLY, MONTHLY, BIMONTHLY (every 2 months), QUARTERLY, EVERY 6 MONTHS, or ANNUAL. |
| Start date * | The first charge date. |
| End date (optional) / Total payments (optional) | Stops the schedule after a date or a count. Blank means it bills until cancelled. |
| Description (optional) | Shown on the customer's receipts, for example Monthly dental cleaning plan. |
| Create schedule | Saves it. A split confirms how many schedules were made, and says who was emailed to approve a bank share. |
| Split N% of $X (board) | This row is one share of a split schedule. Pause, change or cancel each share on its own row. |
| Customer / Amount / Frequency / Next run / Status | The board columns. Status is Active, Awaiting bank authorization, Paused, Past due (with the next retry date), or Cancelled. |
- Pick a customer first.
- Choose a customer under Customer *, or click New customer.
- Pick at least one item.
- With Pick items from inventory chosen, add an item under Add an item, or switch to Enter an amount.
- There are no items in Inventory yet.
- Add your classes, services or products under Inventory, or enter an amount.
- Add an email address to this customer first.
- The Email the customer buttons need an email on the customer. Edit the customer, add it and try again.
- Pick a payment method. When split, the shares must add up to 100%.
- Pick a card or bank under Bill to. With Split between payment methods on, make the shares total 100%.
- Add an email to this customer, or tick that you have their signed authorization.
- A bank account with no authorization on file needs one or the other.
- Pick a start date (YYYY-MM-DD).
- Set the Start date before you click Create schedule.
Do this with the API:Subscriptions
Bill a bank account (ACH) on a schedule
A bank plan debits the customer's bank account each cycle instead of charging a card. It is set up on the same New schedule form: pick the bank account under Bill to.
- 1Go to Accept Payments → Recurring, click New schedule and pick the customer.
- 2Under Bill to, pick the customer's bank account. None on file? Click Add a bank account, fill in Account holder name, Routing number, Account number, Account type and Holder, and click Save bank account.
Bill to: the customer's bank accounts and the bank buttons. - 3No authorization on file: tick I have the customer's signed bank authorization, or leave it unticked so the customer is emailed to approve. With no bank on file, you can also click Email the customer to add a bank account.
- 4Enter the Amount, Frequency and Start date, and click Create schedule.
A bank debit needs the customer's authorization. One already on file is reused. Otherwise tick I have the customer's signed bank authorization, or leave it unticked and the customer is emailed to approve; the plan starts once they do and shows Pending authorization until then.
No bank account on file and you want the customer to add it: click Email the customer to add a bank account. They get the bank authorization email, connect or enter the bank and sign.
- The plan shows Pending authorization
- The customer has not approved the emailed authorization yet. Nothing is debited until they do.
Do this with the API:ACH
Bill each period, unpaid balance carries forward
A billed plan charges nothing. Each period it emails the customer a bill with a pay link, and the customer pays online. Use it when the customer pays you each month on their own, for example installments under a sales agreement.
- 1Go to Accept Payments → Recurring and click New schedule.
- 2Pick the customer. They need an email address (or a mobile number for a text).
- 3Under How it gets paid, choose Bill only: email a bill each period, the customer pays online.
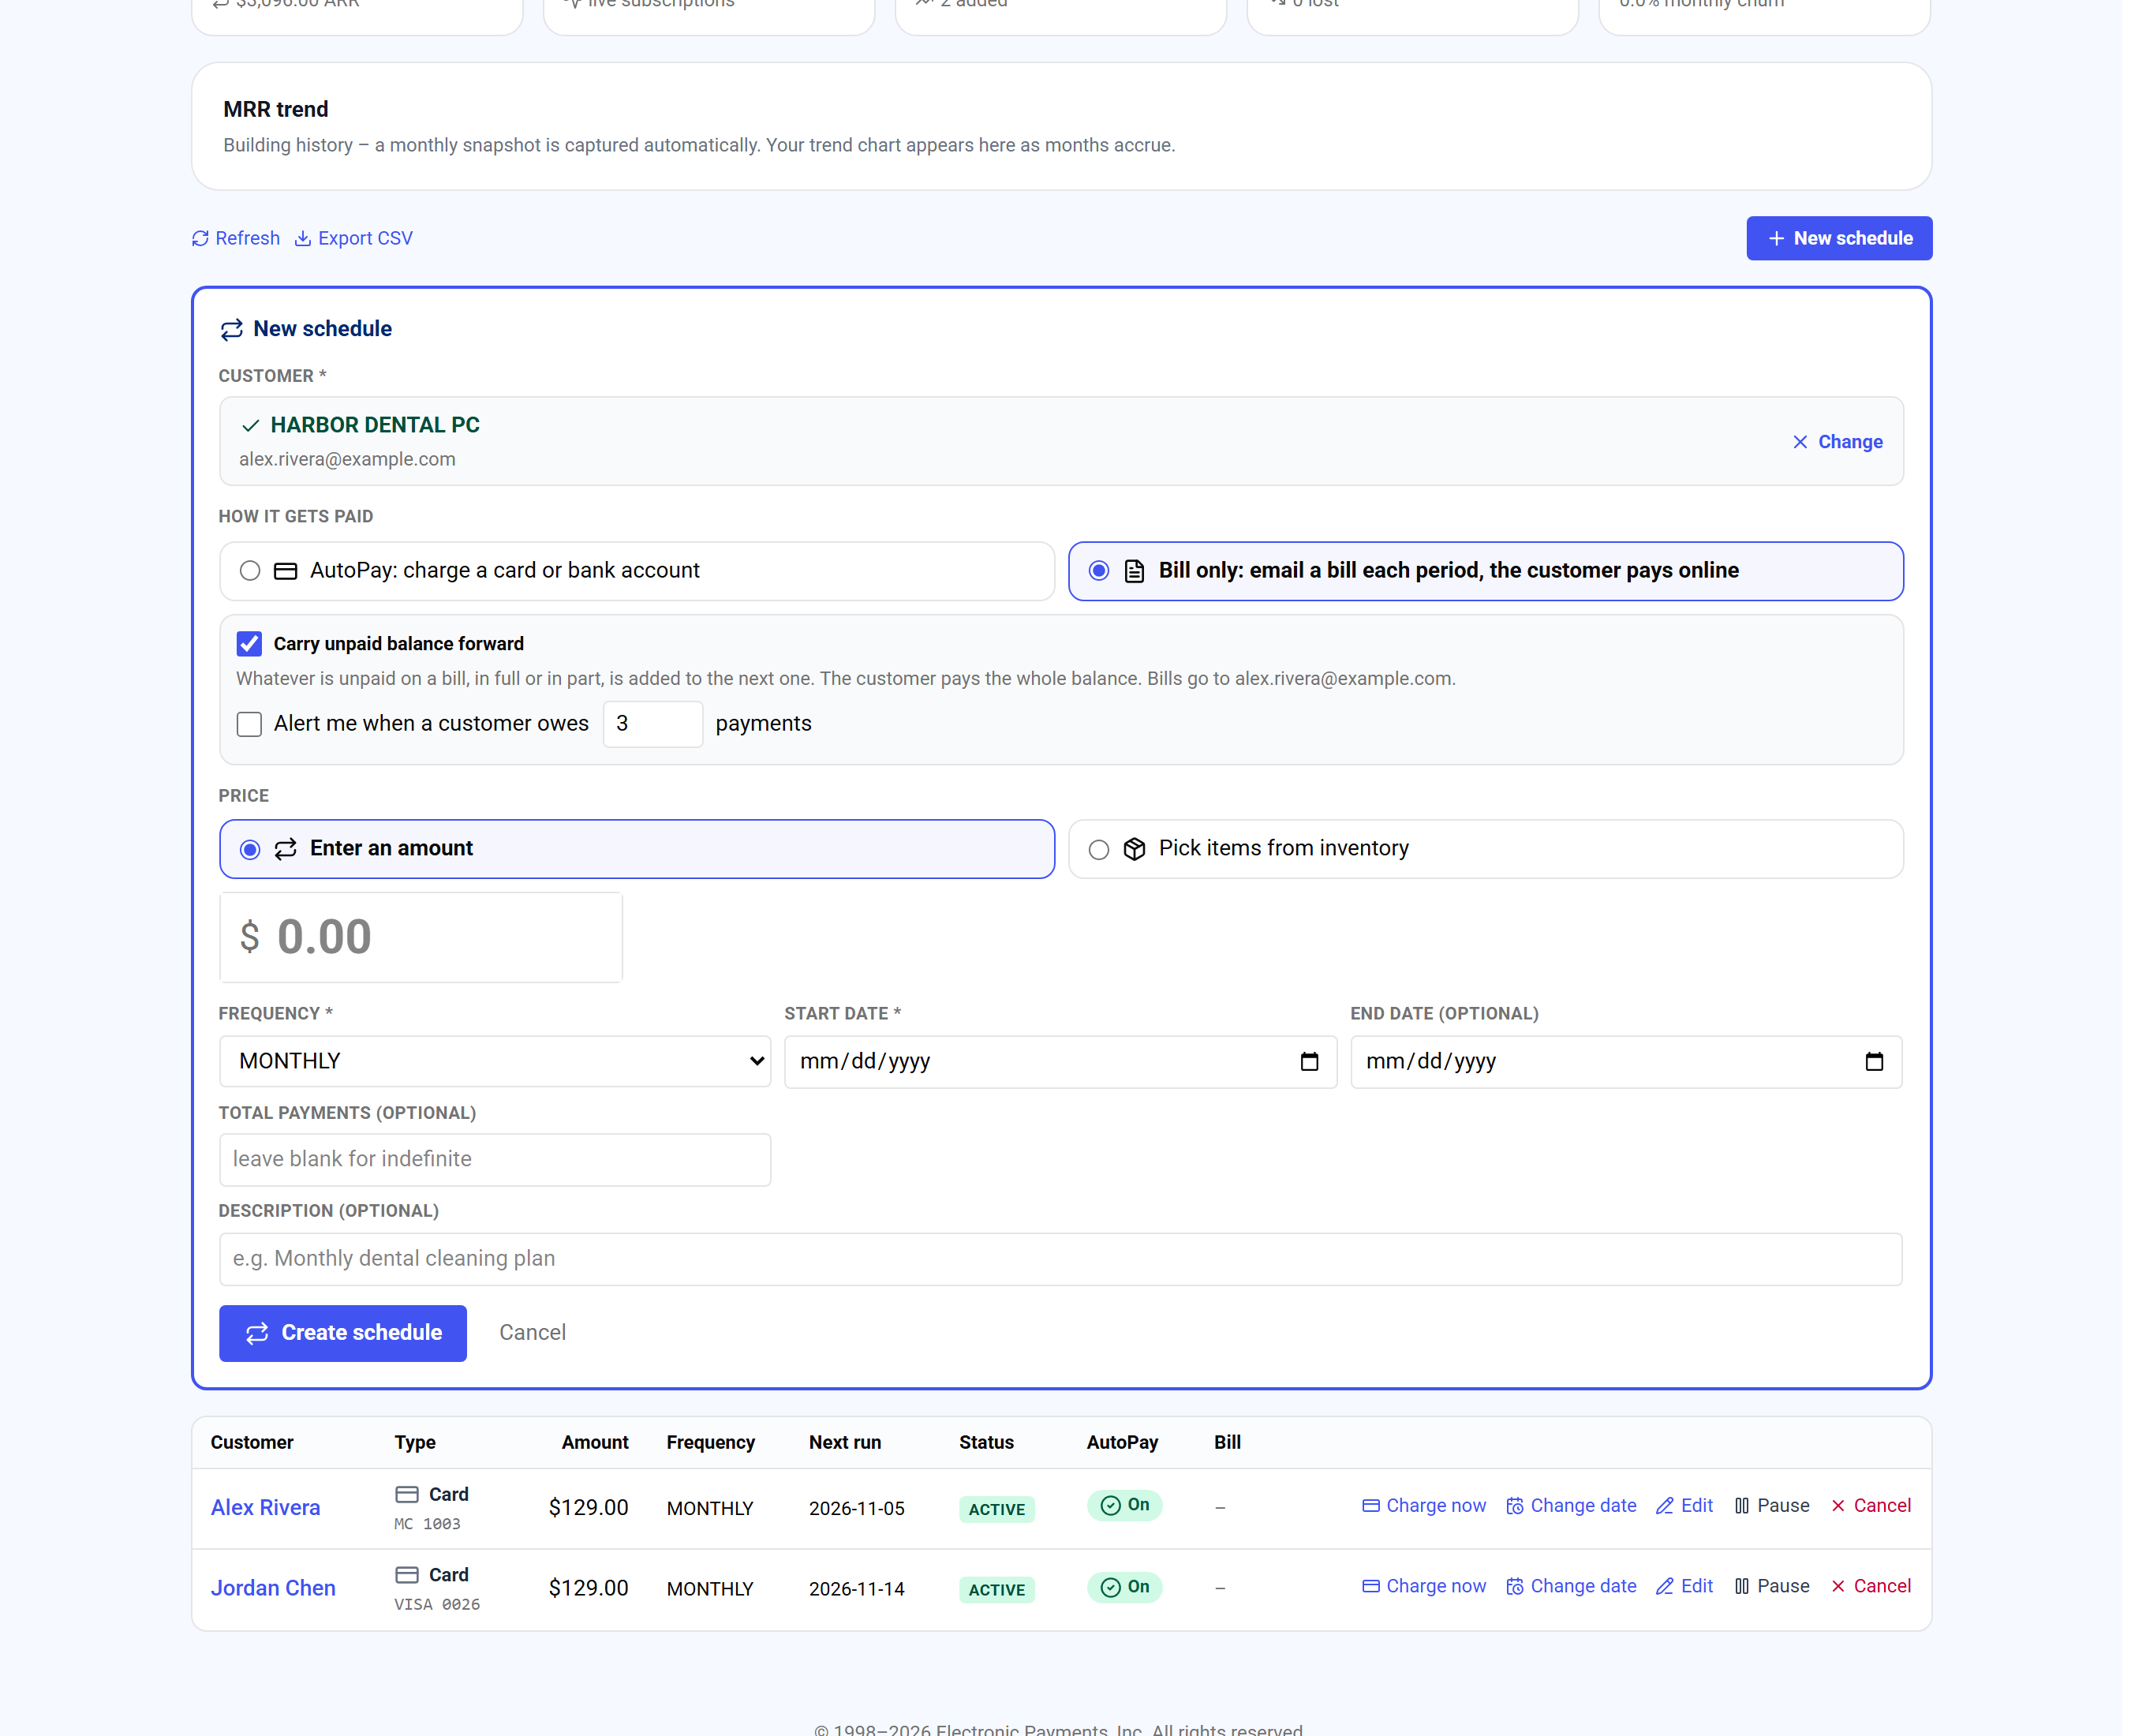
Bill only, with Carry unpaid balance forward. - 4Leave Carry unpaid balance forward ticked, or untick it to send each bill on its own.
- 5Optional: tick Alert me when a customer owes and enter the number of payments (for example 3).
- 6Enter the amount per period, the frequency and the start date (the first bill's due date), and optionally an end date or a total number of payments.
- 7Click Create schedule. The first bill is emailed on the start date.
With Carry unpaid balance forward ticked (the default), a bill that is still unpaid when the next one is due is added to the new bill: the new bill lists the past-due installment and any late fee as Past due lines, plus the current installment. The old bill shows Carried forward with a link to the new one. There is only ever one open bill per plan, and it is the whole balance. Example: $500 a month, two months missed, the third bill is $1,500.
The customer pays the whole bill or nothing: the pay page, the customer statement page and the customer account take the full balance only. Your late fee settings apply to each bill after its grace days, and automatic reminders go out on it like any invoice.
A part payment you record on a bill lowers what carries. When the next bill is issued, the old bill keeps the payment, gets a Balance moved to line for what it still owed and shows Carried forward; the new bill gets one Past due balance line for that amount. Example: a $500 bill with $200 recorded, the next bill is $300 past due plus $500. A bill with a bank payment still settling is not carried; it stays open on its own until the payment settles.
Alert me when a customer owes [N] payments (shown with Carry unpaid balance forward): when a bill is issued that covers N or more unpaid payments, you get an email at your notification addresses, a text to the owner's mobile and a notice in Merchant360, with the customer, plan, payments owed, amount owed and a link to the bill. Each bill alerts once. The plan also shows a red N payments owed badge on Recurring and on the customer's profile. Untick it to turn the alert off.
Done looks like this: the plan shows Bill under Type and Off under AutoPay, and the Bill column shows the open bill's number with Open bill and the balance and, when more than one period is owed, how many periods are unpaid. Click it to open the bill. The customer's profile shows the same under Recurring plans.
Month by month, with $500 a month and Carry unpaid balance forward ticked: on November 1 bill INV-1001 for $500 is emailed. The customer does not pay. On December 1 bill INV-1002 is emailed for $1,000: a Past due line of $500 (November) and $500 for December. INV-1001 now shows Carried forward and links to INV-1002, so the customer is never asked to pay both. On December 10 the customer pays $1,000 on INV-1002 and owes nothing. Had they paid $200 on INV-1001 before December 1, INV-1002 would have been $800 ($300 past due plus $500).
With Carry unpaid balance forward unticked, each bill stands on its own: INV-1001 stays open for $500 and INV-1002 is $500, and the customer pays each one separately.
| On this screen | What it does |
|---|---|
| Bill only: email a bill each period, the customer pays online | The plan emails a bill each period instead of charging a card or bank. |
| Carry unpaid balance forward | An unpaid bill is added to the next one, so the open bill is always the whole balance. Also on Edit. |
| Alert me when a customer owes [N] payments | Email, text to the owner and a Merchant360 notice once per bill when it covers N or more unpaid payments. Also on Edit and on Bill each period in the invoice builder. |
| Open bill $X · N periods unpaid (Bill column) | What the customer owes now. Opens the bill. |
| N payments owed (red badge) | The open bill has reached the plan's alert count. |
| Carried forward (invoice status) | The bill's balance (what was left after any part payment) moved to the newer bill. It is not a cancellation and is not counted in open balances. |
| Bill each period (invoice builder) | Under How will this be paid? on a new invoice: the invoice is the first bill of the plan, and the next bill goes out one period after it is due (or on Next bill on). |
Plans and usage
Reusable prices, trials, setup fees and usage billing.
Reusable price plans
If you sell the same subscription over and over, define it once as a plan and attach it, instead of re-entering the amount each time. Go to Accept Payments → Plans. A plan holds the price, the interval, the tax, any trial or setup fee, and the features you want customers to compare.
- 1Give the plan a code (like PRO-MONTHLY) and a name.
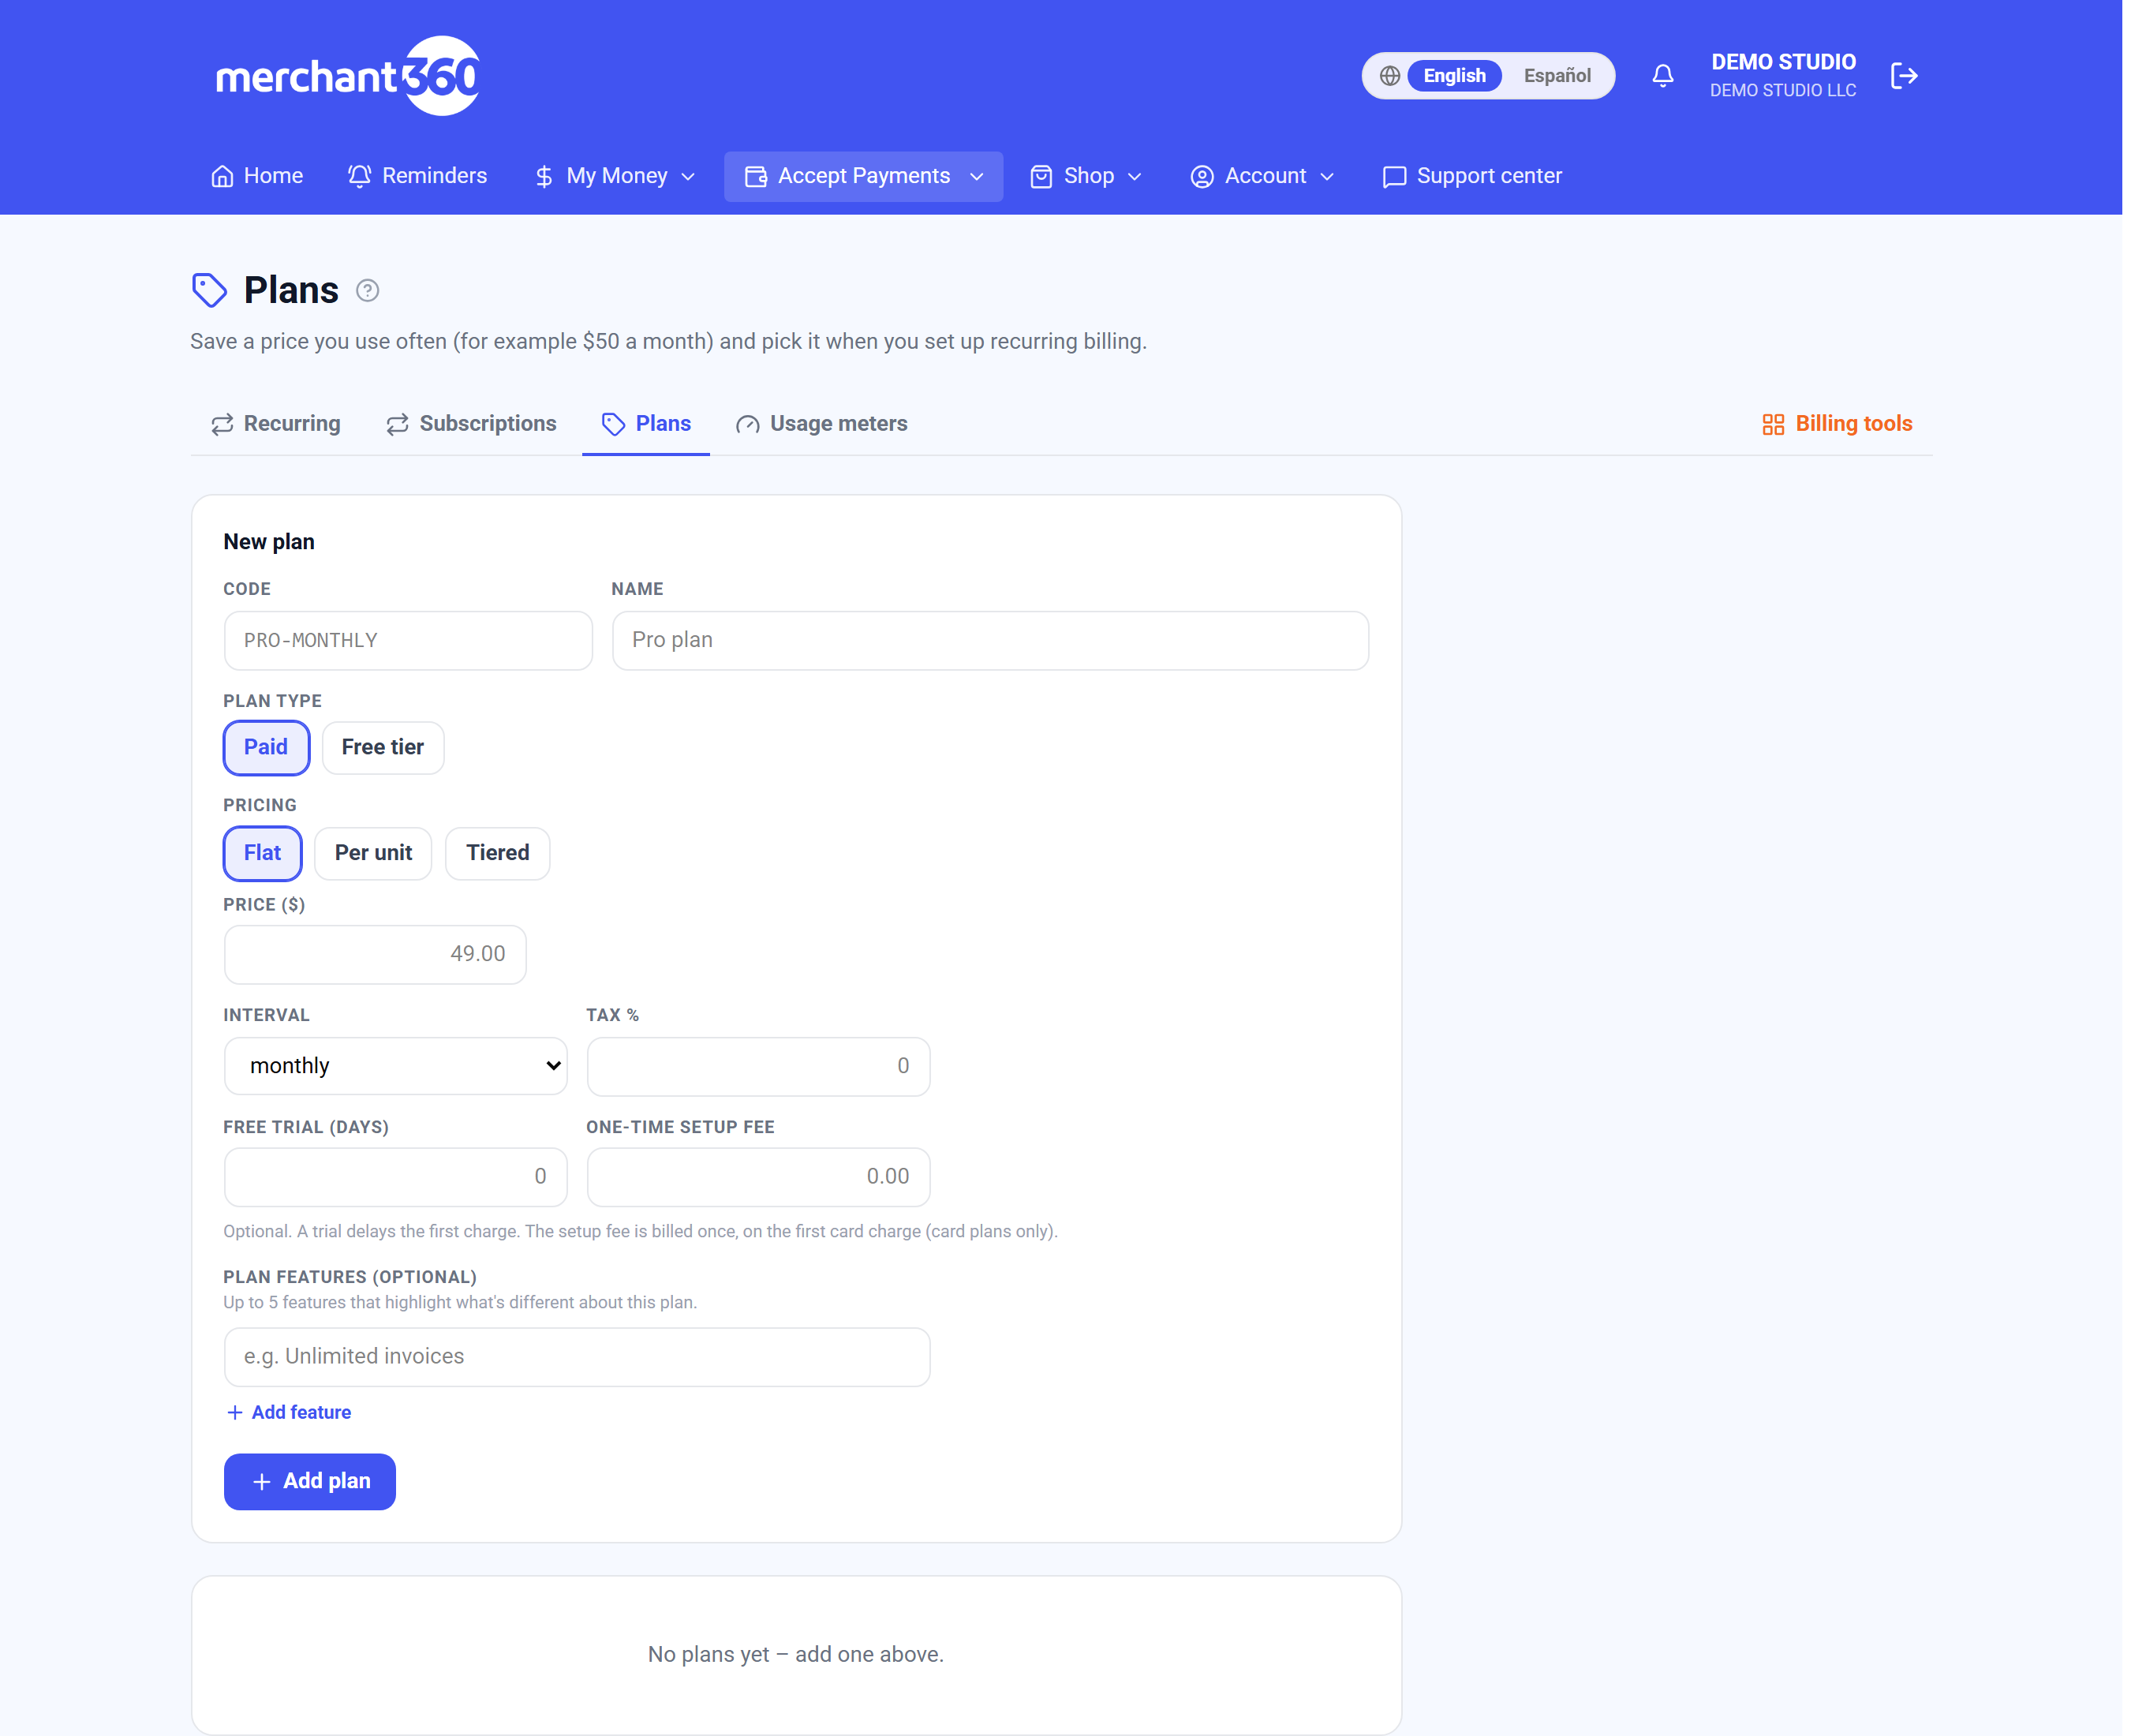
Accept Payments → Plans: the New plan form. - 2Choose Paid or Free. Free is a $0 tier for freemium; Paid is charged.
- 3For a paid plan, choose a pricing mode: Flat (one price), Per unit (a price times a quantity, like per seat), or Tiered (volume pricing, where the first so-many units are one rate and the next tier another).
- 4Set the interval (weekly, every 2 weeks, monthly, quarterly, annual, or a custom number of days) and a tax rate if it applies.
- 5Optionally add a free trial (in days) and a one-time setup fee (see the next section).
- 6Add up to 5 plan features – short bullets that highlight what's different about this tier. They help customers compare your free and paid plans.
- 7Save it, and the plan is ready to attach to recurring subscriptions. Archive a plan when you retire it.
You can run three plan structures: Paid (a normal charged plan), Free trial (a paid plan that delays the first charge, see the next section), and Freemium. Freemium means offering a Free tier alongside one or more paid tiers: create a plan, choose Free tier, and pair it with your paid plans. A free plan never charges. Any paid plan can also start with a free trial.
Paid plans have three pricing modes. Flat is one price per cycle. Per unit is a price times a quantity, like per seat or per user, with a unit name of your choosing. Tiered is graduated volume pricing: the first so-many units at one rate, the next range at another, with the last tier left unlimited.
Done looks like this: the plan appears in the list with its Code, Name, Price, and Interval, and it is available to pick when starting a subscription from a checkout page, the pay widget, or the invoice builder. Archive a plan when you retire it; existing subscriptions keep billing at their price.
If Add plan fails, the Code and Name are both required, the price must be valid, a custom interval needs a day count, and a per-unit plan needs a price above zero. If you change a plan's price, existing subscribers keep their current amount; change a subscriber's amount from the Recurring board.
| On this screen | What it does |
|---|---|
| New plan | Opens the form. |
| Code | A short identifier like PRO-MONTHLY, used in the API and on the board. |
| Name | The customer-facing name. |
| Plan type | Paid, or Free tier (a $0 tier to pair with paid plans). |
| Pricing | Flat, Per unit, or Tiered. |
| Price ($) | The flat price per cycle. |
| Price per unit / Unit name | For Per unit plans: the rate and what a unit is called. |
| Tiers | For Tiered plans: First up to N at a rate, Then up to N at a rate; leave the last up to blank for unlimited. Add tier adds a row. |
| Interval | weekly, every 2 weeks, monthly, quarterly, annual, or custom with Every N days. |
| Tax % | Sales tax applied to each charge, if any. |
| Free trial (days) | Delays the first charge by this many days. |
| One-time setup fee | Billed once, on the first card charge. |
| Usage overage (flex fees) – optional | Pick a Meter and the units included per period. See Flex fees. |
| Plan features (optional) | Up to 5 short bullets shown when customers compare plans. |
| Add plan | Saves the plan. |
| Archive | Retires the plan from new signups. Existing subscriptions keep billing. |
- Code and name are required.
- Fill in both before you click Add plan.
- Enter a valid price.
- Type the price as a number, for example 49.00.
- Custom interval needs a day count.
- With a custom interval, enter Every N days.
- Per-unit price must be greater than 0.
- A Per unit plan needs a price above zero.
- Add at least one pricing tier.
- A Tiered plan needs at least one tier.
Do this with the API:Subscriptions
Free trials & setup fees
A plan can start with a free trial, a one-time setup fee, or both. You set these on the plan under Accept Payments → Plans (Free trial in days, and One-time setup fee), or on a subscription plan in the pay widget, and they carry through to the customer's signup page.
- 1On a card signup with no trial, the customer is charged the first period plus any setup fee today, then the plan price each cycle.
Free trial (days) and One-time setup fee on the plan. - 2On a card signup with a trial, only the setup fee (if any) is charged today; the first plan charge lands when the trial ends.
- 3A free trial with no setup fee charges nothing today – the card is saved without a charge, and the first plan charge lands when the trial ends. Customers can also start a trial by bank (ACH); bank signups never pay a setup fee (the bank authorization covers a single recurring amount).
A free trial delays the first recurring charge by the number of days you set: the subscriber is not billed during the trial, and billing begins automatically when it ends. A setup fee is a one-time charge collected at signup (for example an activation or onboarding fee); it is billed once, on the first card charge, and never repeats.
Done looks like this: the customer's signup receipt shows what was charged today (the setup fee, the first period, both, or nothing), and the subscription shows its next charge date at the end of the trial. When the trial ends the first plan charge runs and a receipt is emailed.
If a trial signup charged nothing and you expected the setup fee, the fee is billed on the first card charge, which for a trial with no fee is the end of the trial; add a setup fee to collect something today. Bank signups never pay a setup fee because the bank authorization covers a single recurring amount.
| On this screen | What it does |
|---|---|
| Free trial (days) | On the plan. The number of days before the first recurring charge. |
| One-time setup fee | On the plan. Charged once on the first card charge, never repeated. |
| Next charge | On the subscription and the subscriber's page: the date the trial ends and billing starts. |
Usage meters (charge by usage)
A usage meter charges by how much a customer uses (per message, per token, per API call, or any custom event) instead of a flat monthly price. Go to Accept Payments → Usage meters. Meters are for businesses whose software or team can report usage as it happens.
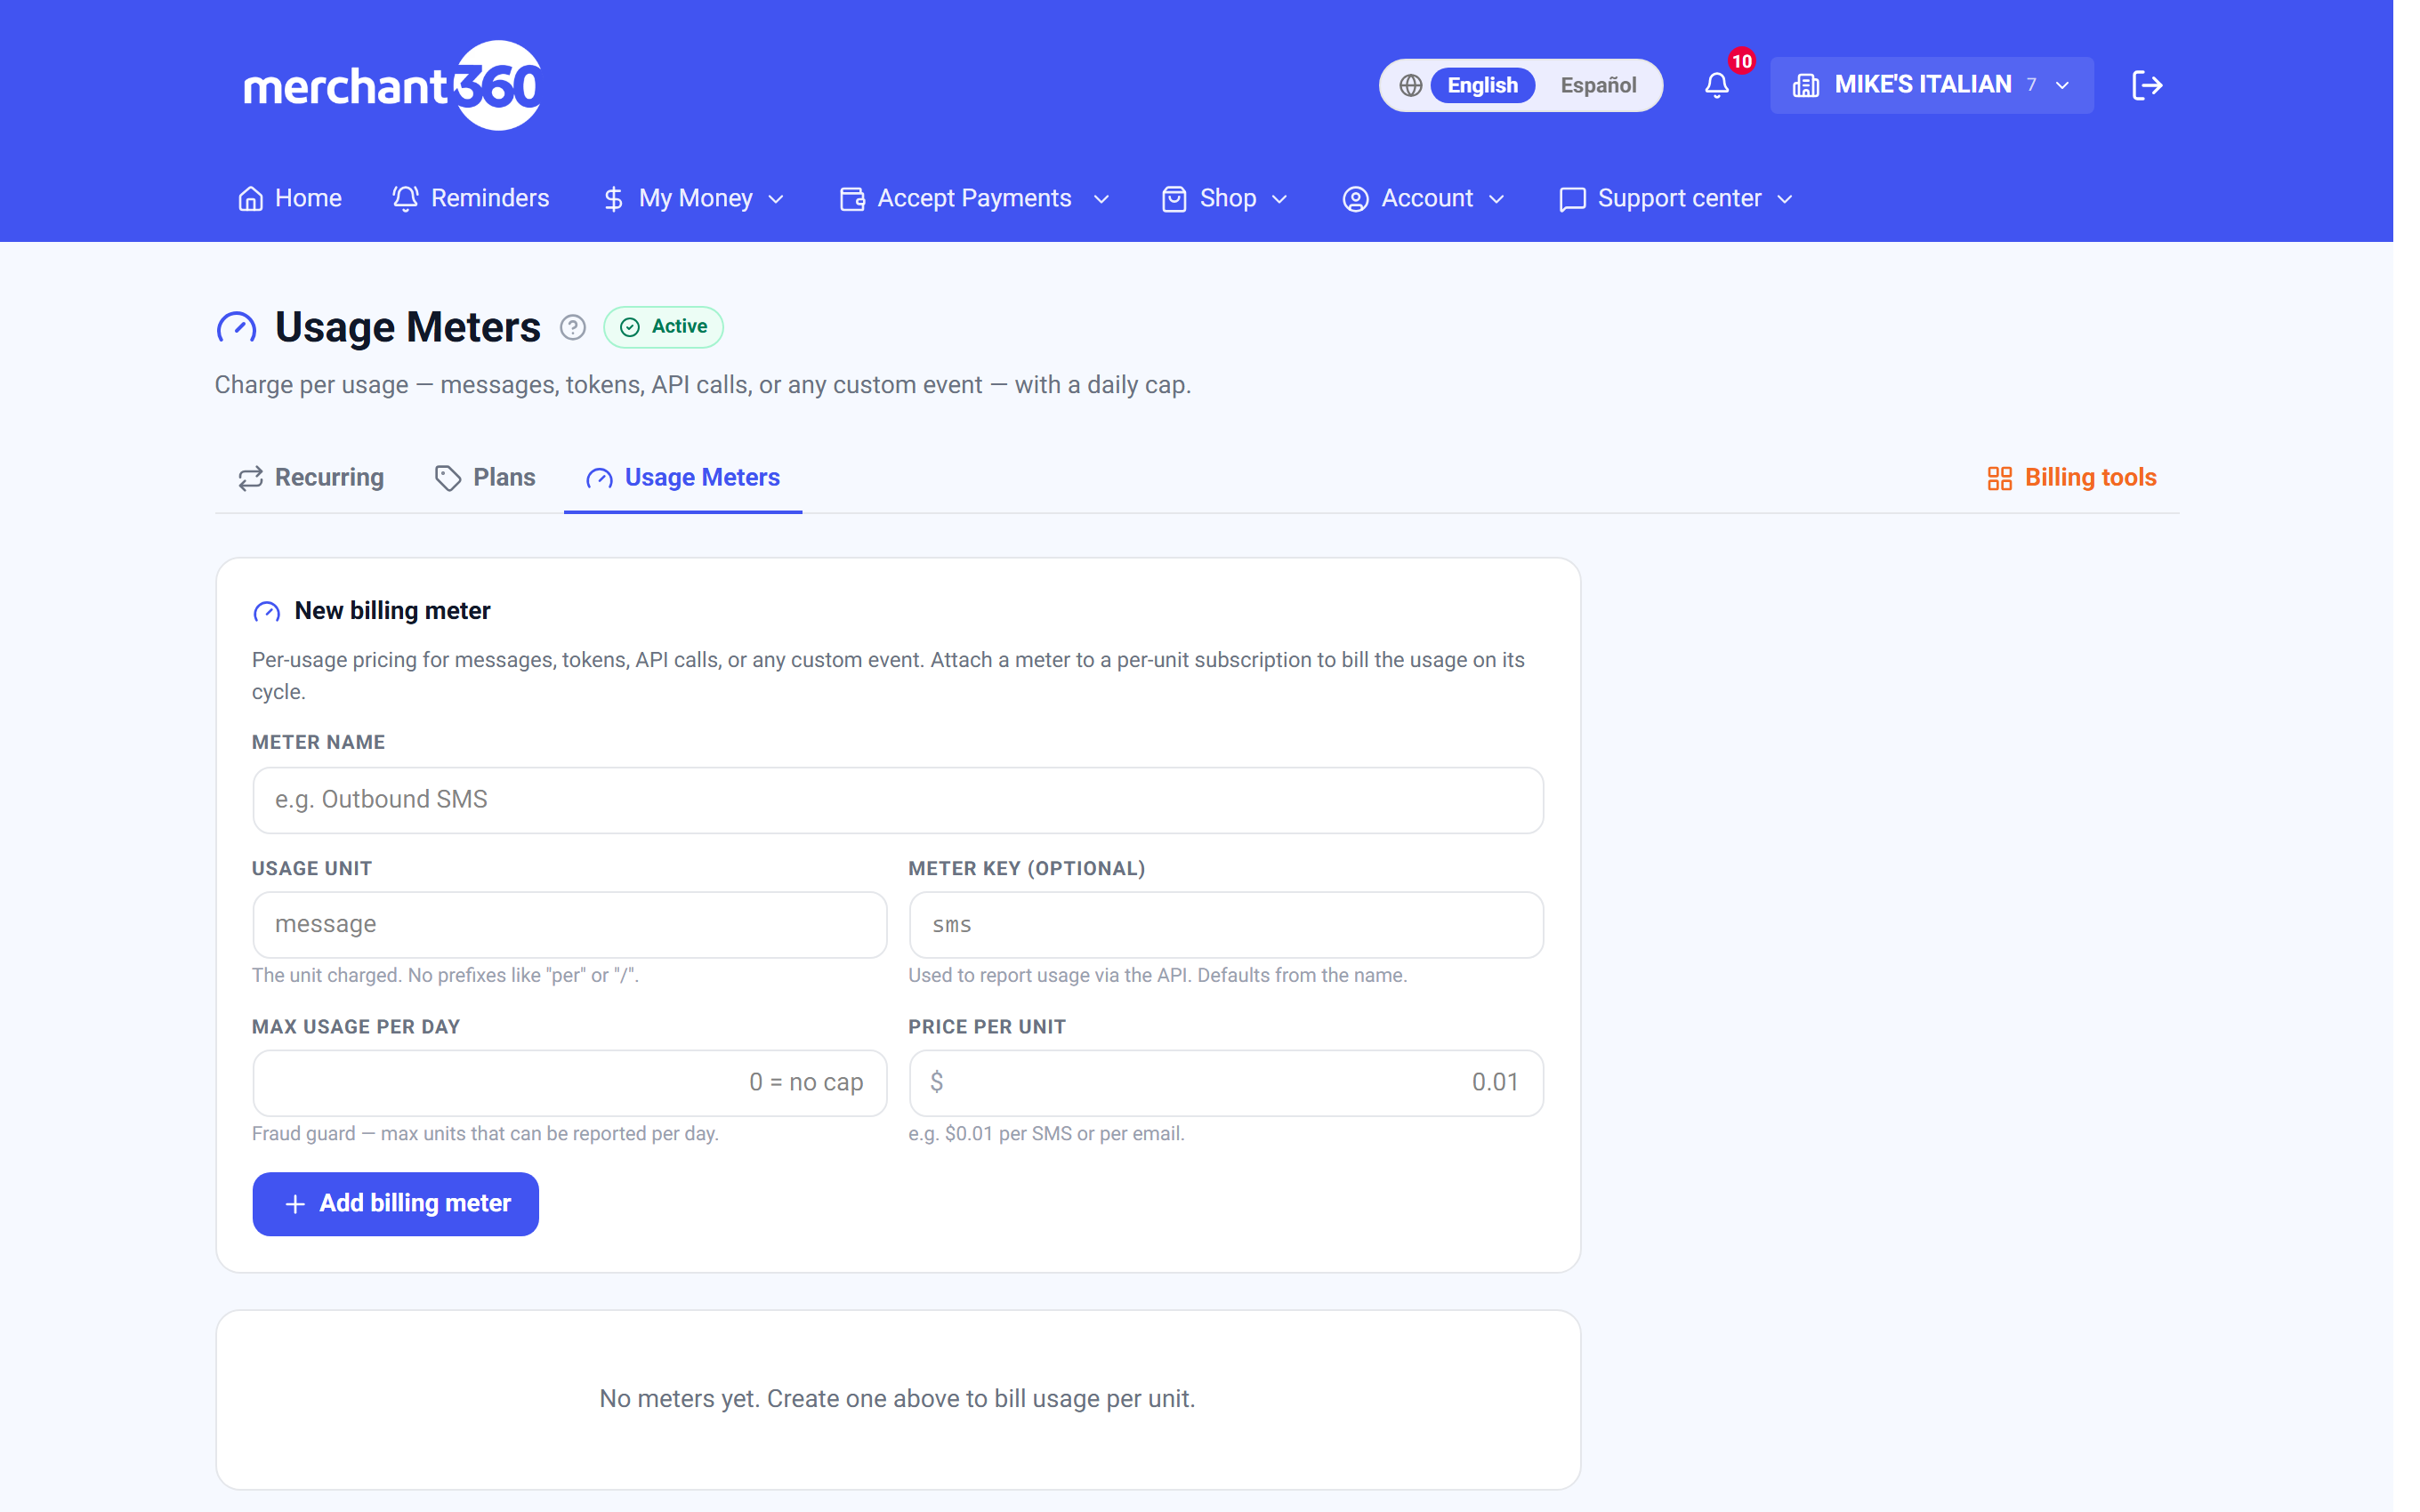
- 1Create a meter: give it a name, the unit charged, a price per unit, and a max-per-day cap (0 for no cap).
- 2Note the meter key (it defaults from the name). You use it to report usage from your system.
- 3Attach a per-unit subscription to the customer so the meter's usage has a cycle to bill on.
- 4Report usage as it happens (from your app via the Merchant360 API, POST /meters/{key}/usage). Each report counts toward the daily cap; once the cap is hit, further reports for the day are declined.
- 5On the subscription's billing date, the reported units are totaled and charged at the meter's price.
Each meter has a name, a usage unit (like message), a price per unit (like $0.01), a meter key used to report usage, and a daily cap that limits how many units can be reported per day as a fraud guard. Usage you report through the meter is added up and billed on the subscription's next cycle.
Report usage two ways. From your own system, call the Merchant360 API (POST /meters/{key}/usage) each time the metered thing happens, or in batches with a quantity; the endpoint is documented under Developers → API. By hand, the Usage-based plans card on the Recurring board lists each metered subscription with its pending units this cycle and a field to Add units and Record them.
Done looks like this: the meter appears in the list with its Key, Unit, Price / unit, and Daily cap; the subscription shows units pending this cycle; and on the billing date the charge equals the units times the meter price, shown on the customer's receipt.
If a report is declined, the daily cap was hit for that meter; raise the cap (or set 0 for none) if the volume is legitimate. If usage was recorded but nothing billed, the customer has no active per-unit subscription attached to that meter; the usage has no cycle to bill on until one is created.
| On this screen | What it does |
|---|---|
| New billing meter | The form at the top of the page. |
| Meter name | What the meter is called on receipts and reports. |
| Usage unit | The thing being counted, for example message or token. |
| Meter key (optional) | The identifier your system reports usage with. Defaults from the name. |
| Max usage per day | The daily cap. Reports beyond it are declined for the rest of the day; 0 means no cap. |
| Price per unit | What each unit costs. |
| Key / Unit / Price / unit / Daily cap | The columns of the meter list. |
| Archive | Retires a meter. Usage already recorded still bills. |
| Usage-based plans (Recurring board) | Each metered subscription with units pending this cycle. Add units then Record posts usage by hand. |
- Enter a quantity.
- On the Usage-based plans card, type the units before you click Record.
- Couldn't record.
- Try again. A report past the meter's daily cap is declined for the rest of the day.
Flex fees – included usage plus overage
Flex fees combine a flat plan price with a usage allowance and per-unit overage, the way many software products price their tiers. A plan charges its normal monthly (or annual) price and includes a set number of units of a meter each period; only usage beyond that allowance is billed, at the meter's per-unit price.
Example: a Pro plan is $49/month and includes 1,000 API calls. A customer who makes 1,000 or fewer calls pays exactly $49. A customer who makes 1,300 pays $49 plus 300 times the meter's price. Your Free, Basic, and Pro tiers can each include a different allowance of the same meter.
Set it up in two places. First create the meter under Usage meters; its price per unit is the overage rate. Then create or edit a paid plan under Plans and, in the Usage overage (flex fees) section, pick that meter and enter how many units the plan includes per period. Attach the plan to subscriptions as usual and report usage against them through the meter.
Done looks like this: at each billing date the receipt shows the plan price plus an overage line only when the period's usage exceeded the allowance. A light user never sees more than the plan price.
If overage is charged when you expected none, check the included units on the plan and that usage is being reported against the right subscription. If the Meter dropdown on the plan shows None only, create the meter first.
- 1First create the meter you'll charge overage on (Accept Payments → Usage meters) – its price per unit is the overage rate.
- 2Create or edit a paid plan (Accept Payments → Plans). In the Usage overage (flex fees) section, pick that meter and enter how many units the plan includes per period.
- 3Attach the plan to a customer's subscription as usual. Report usage against that subscription through the meter as it happens.
- 4At each billing date, Merchant360 totals the period's usage, subtracts the included allowance, and adds the overage (extra units times the meter price) to the plan's flat price on that one charge.
| On this screen | What it does |
|---|---|
| Usage overage (flex fees) – optional | The section on the plan form. |
| Meter | Which usage meter the plan includes. None turns flex fees off for that plan. |
| Included units per period | How many units the flat price covers each cycle. Usage above this bills at the meter's price. |
| Overage line | On the customer's receipt: extra units times the meter price, added to that one charge. |
Run your plans
Change, pause and recover plans, and watch your numbers.
Pause, resume & change the amount
From the board, each schedule has actions by status. Pause a subscription and billing stops at the next cycle with nothing lost; Resume it later to pick back up on the same cadence. Cancel ends it for good; already-billed charges are not affected, and reviving it means creating a new schedule.
- 1Go to Accept Payments → Recurring and find the plan in the list. Its buttons sit at the right of the row. The same buttons are on the customer's profile under Recurring plans.
The row actions on Recurring. - 2Edit: change the plan name, amount, frequency, next charge date or end, and click Save plan. Close shuts the form without saving; it does not cancel the plan.
- 3Pause gives two choices. Pause for one billing cycle skips the next charge, and the plan starts again on the charge after it; the status shows Resumes and the date. Pause until resumed stops billing until you click Resume.
- 4Change date moves the next charge. Type the date as YYYY-MM-DD.
- 5Charge now runs the charge today instead of on the scheduled date, after you confirm.
- 6Cancel plan ends the plan after you confirm. Charges already made are not affected.
- 7Export CSV downloads the plans on the list (cancelled and ended plans are on each customer's profile).
Edit opens the plan under its row: plan name, amount, frequency, next charge date, and when it ends (never, after a number of payments, or on a date). Save plan applies it; a new amount applies from the next charge. Edit works on active, paused, past due and waiting-for-approval plans. On an active plan, changing the amount shows a tick box to charge or credit the difference for the rest of this period now; the next charge date stays as is when it is ticked. A share of a split payment keeps the amount set by the split. The customer's name opens their profile, where the name and contact details can be changed. Export CSV downloads every plan on the board: customer, the old gateway's customer ID for imported plans, email, phone, plan name, amount, frequency, next charge, end, what it is charged to, and status.
Done looks like this: the Status column changes to Paused or back to Active, the Next run date moves, and the customer sees the new amount on their next receipt and on their self-serve page.
If Pause is missing, the schedule is already paused or cancelled. If an upgrade charge declines, the amount does not change; fix the card first. Cancelling a schedule does not remove the card from the vault.
| On this screen | What it does |
|---|---|
| Pause | Stops billing at the next cycle. The schedule shows Paused. |
| Resume | Restarts a paused schedule on its cadence. |
| Edit | Opens the plan under its row to change its name, amount, frequency, next charge date and end. A new amount applies from the next charge. On an active plan, a tick box can instead charge the difference for the rest of this period to the card now, or credit a lower amount by moving the next charge later. |
| Customer name | Opens the customer's profile. |
| Export CSV | Downloads every plan on the board for review. |
| Cancel | Ends the schedule after a confirmation. Past charges are unaffected. |
| Retry now | On a Past due schedule, runs the failed charge again immediately. |
- Enter a valid amount.
- Type the new amount as a number.
- Couldn't change the amount.
- Refresh the page and try again.
- Charge declined.
- The card declined on Charge now or Retry now. The plan keeps its schedule; send the customer a card update link.
When a card fails: dunning
A declined renewal does not just die. The system reads why the card failed and retries on a schedule while emailing the customer a link to update their card. You do nothing unless you want to.
- 1A soft decline (a temporary issue or insufficient funds) retries the next day, then 3 days later, then 5 days later.
- 2Suspected fraud, or a card the bank blocked or the customer has not activated, retries once the next day. These often clear after the customer answers the bank's alert or activates the card.
- 3An expired or invalid card, or a closed account, gets one courtesy retry 3 days later and an email asking the customer to update their card.
- 4A card reported lost or stolen, or one the bank says to keep, is not retried, and you're alerted.
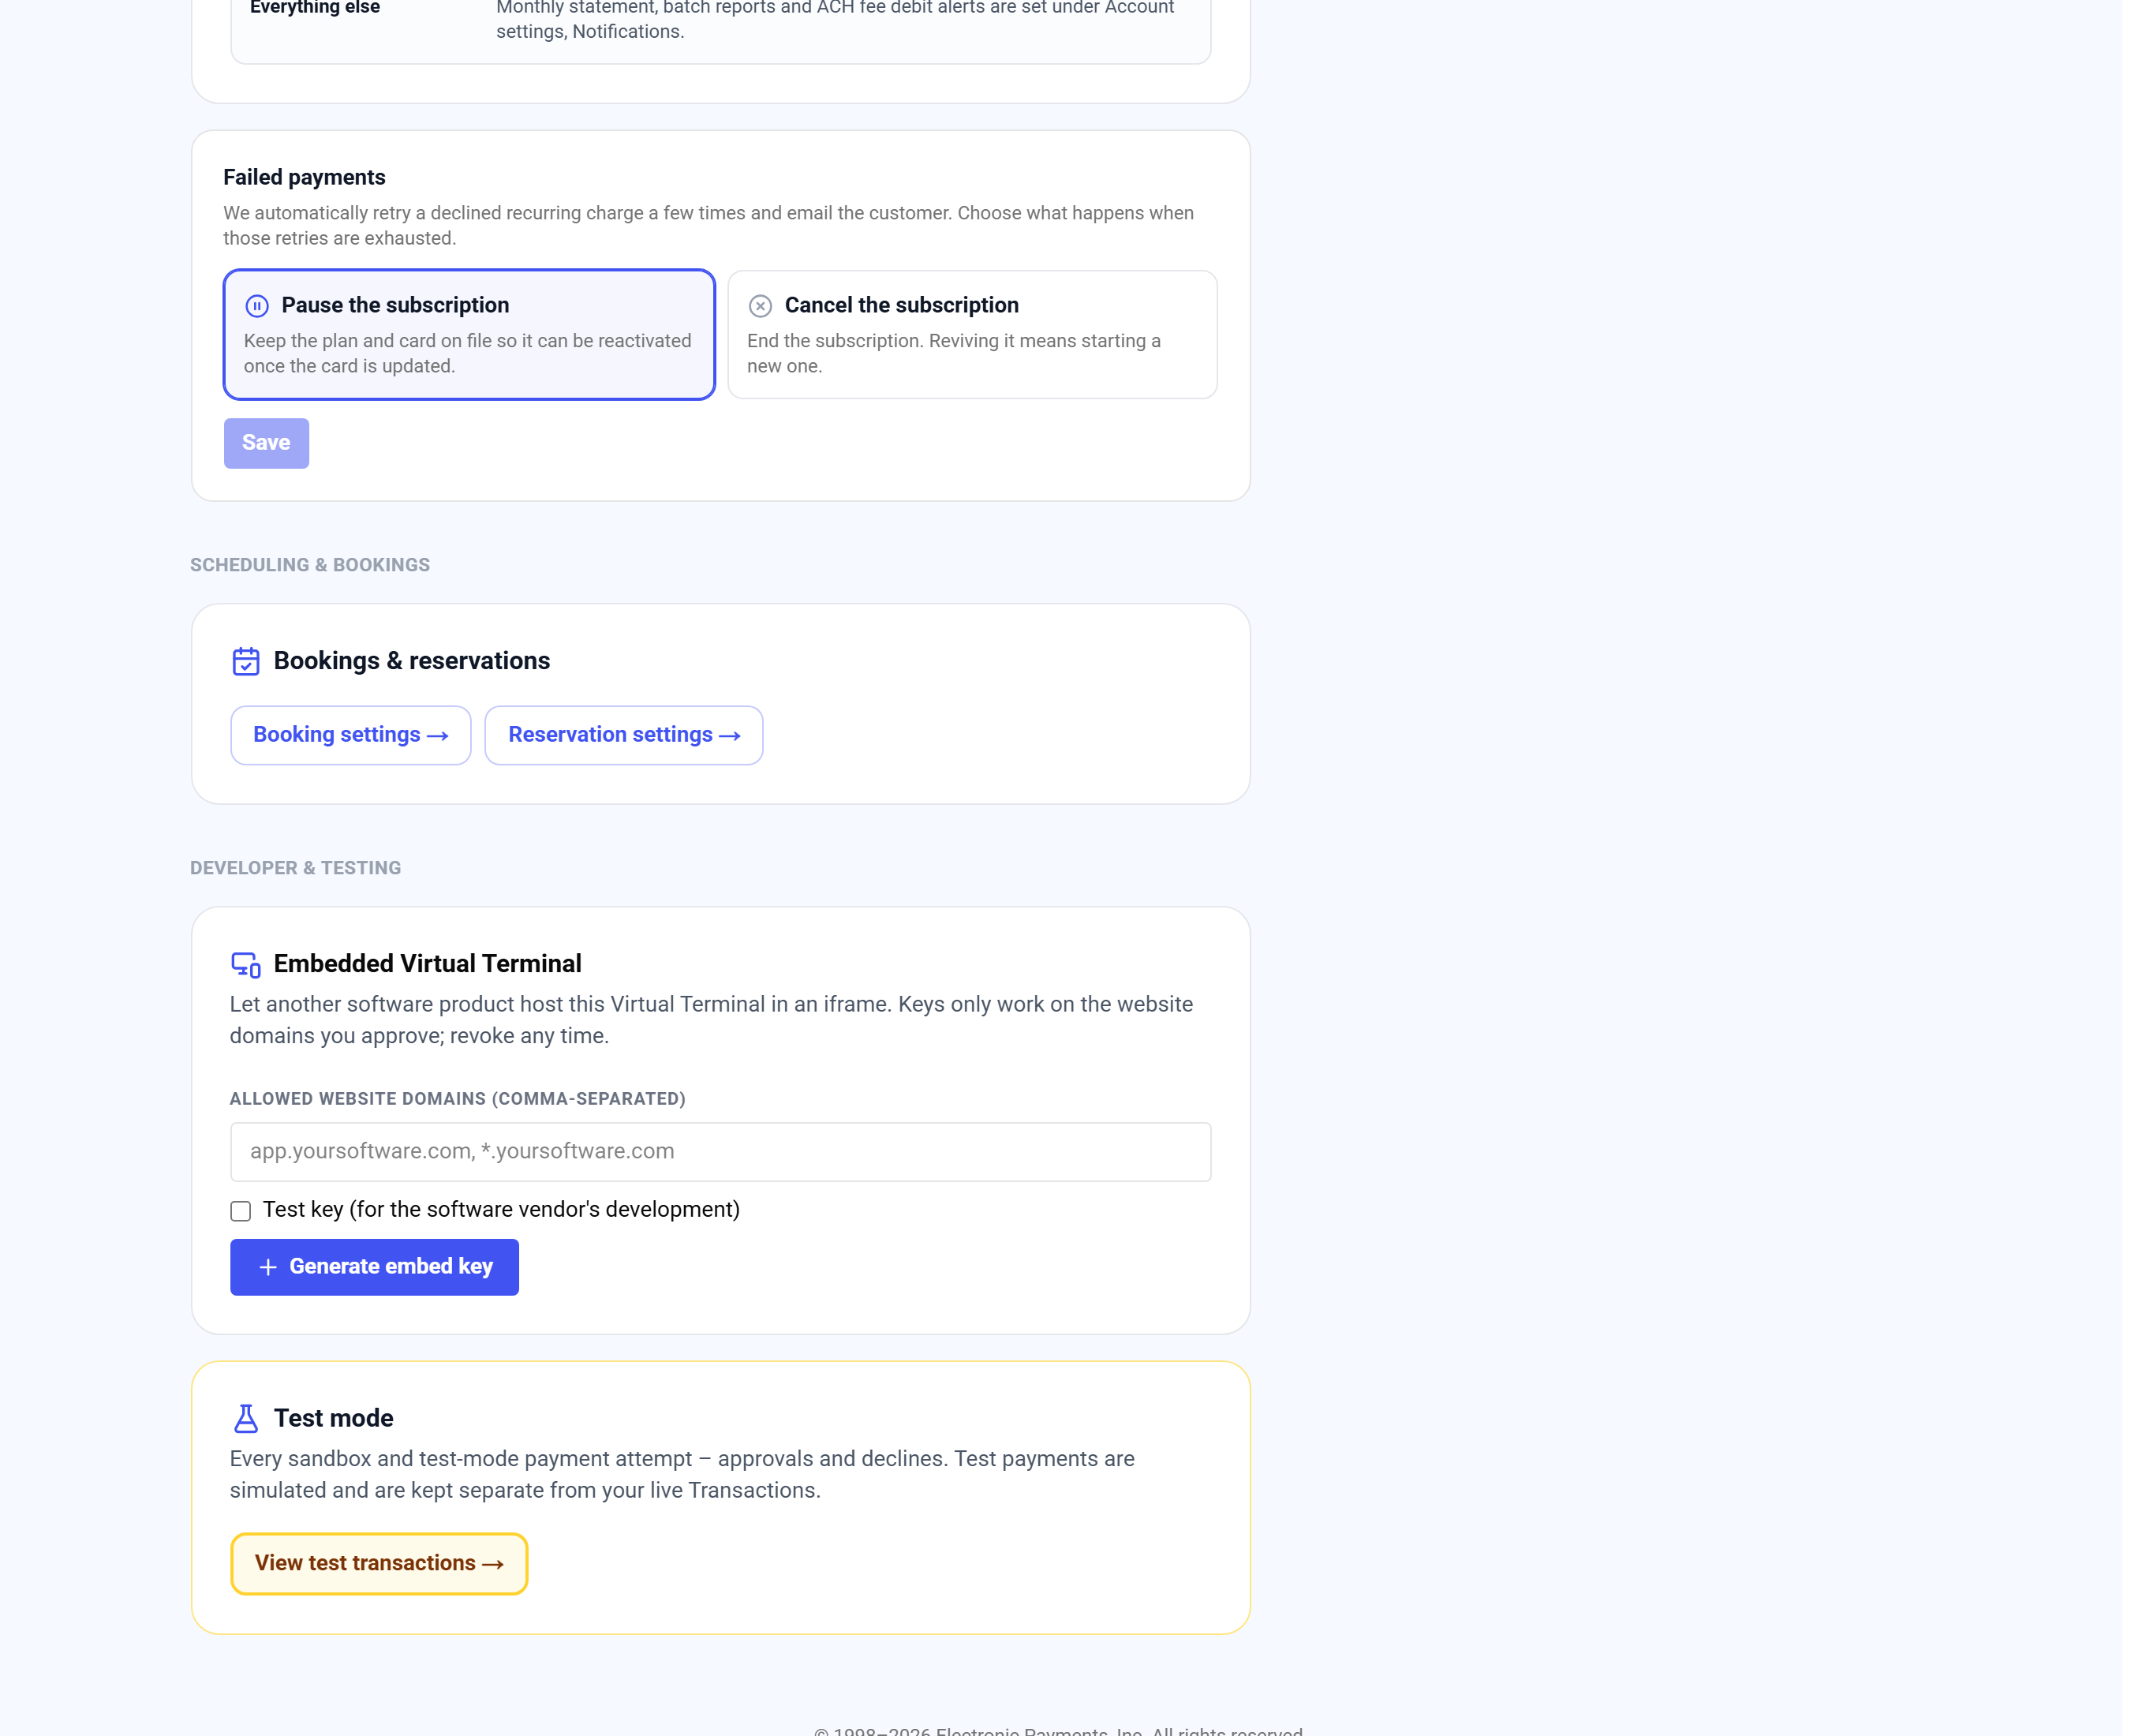
Billing settings → Failed payments. - 5While a plan is chasing a payment it shows as Past due; you can Retry now any time. When the card recovers, it returns to Active on its own.
Done looks like this: the schedule shows Past due with its next retry date on the board, the customer has an email with the update link, and when a retry approves the schedule returns to Active on its own and the charge appears in Transactions as a Subscription or Manual retry.
Decide what happens when retries are exhausted under Accept Payments → Settings → Failed payments: Pause the subscription (the default, keeping the plan and card on file so it can be reactivated once the card is updated) or Cancel the subscription (ending it, so reviving it means starting a new one).
If a customer has a new card, send the update link from Saved cards → Expiring cards or have them use the link in the dunning email; saving the card retries the overdue charge immediately. If a hard decline is reported (lost, stolen, or fraud), the card is not retried; contact the customer for a different card before resuming.
| On this screen | What it does |
|---|---|
| Past due | The status while a charge is being chased, with the next retry date. |
| Retry now | Runs the failed charge again on demand. |
| Failed payments (Settings) | Pause the subscription or Cancel the subscription when retries are exhausted. |
| Update payment card link | In every dunning email. Opens the subscriber's self-serve page where a new card retries the overdue charge. |
| Suspend billing (Expiring cards) | Pauses every plan charging an expired card in one click; resume them from the Recurring board. |
Needs attention: fix declined and waiting plans
When plans need you, a yellow bar at the top of the Recurring list says how many. Click Show them, or pick Needs attention under Status. It lists every plan that declined and is retrying, has no card (the card was removed, or an imported plan waits for the customer), was paused after declines, or has a new card and is ready to resume. Each one says what it needs.
Fix it from the row. Change card puts another of the customer's saved cards on the plan, or click Add a card to enter a new one. Send card link emails the customer a secure link with your business name and logo to add a new card: the card replaces the old one on all their plans. Retry charges a past-due plan now. Resume starts a paused plan again. Cancel takes the plan off billing.
Removing a customer's card pauses every plan that used it. The plan reads Waiting for the customer's card. No charge is tried and no past-due email goes out until it has a card and you resume it.
Removing a customer's bank account moves their bank plans to their other bank account when that account has a signed recurring authorization. With none, the plan pauses and reads Waiting for the customer's bank account. Once the customer adds an account and authorizes it, Resume moves the plan to it.
Customers whose card declines are emailed automatically, with your logo: a retry notice, a request to update an expired or closed card, or a paused notice when the retries run out.
| On this screen | What it does |
|---|---|
| Needs attention (Status filter) | Only the plans that declined, wait for a card, or are ready to resume. |
| Change card | Pick another saved card for the plan, or add a new one. |
| Send card link | Emails the customer a link to add a new card. It goes on their plans. |
Recurring results and the daily email
Click Results on the Recurring page for every recurring charge by day: the customer, card or bank with the last 4, the amount, and the result. Card payments read Approved or Declined, and are final the day they run. Bank payments read Pending when they go to the bank, then Settled or Returned. Pick the dates (Today, Last 7 days, Last 30 days or your own), card or bank, click a total to see only those charges, and Export to a spreadsheet.
After each day's recurring run, the email addresses under your notification settings get a short summary: cards approved and declined, bank payments sent and pending, and how many plans need attention, with links to the results and to Needs attention.
| On this screen | What it does |
|---|---|
| Results | Opens the recurring results report. |
| Totals | Card approved, card declined, bank pending, bank settled, bank returned and not charged. Click one to filter the list. |
Know your recurring revenue
The Recurring page opens with a metrics strip: MRR (monthly recurring revenue, with its annual run-rate), Active subscriptions, New this month, Churned this month, and Net new MRR with your monthly churn rate. The MRR trend card underneath charts the last 12 months.
These are your real subscription numbers, month over month, without a spreadsheet. A monthly snapshot is captured automatically on the first of each month, so the chart builds as months accrue; a new account shows Building history until it has a few points.
Use it to spot churn early: a month where Churned outpaces New shows up as a dip in net MRR before it shows up in your deposits.
If the numbers look low, paused and past-due schedules are not counted as active MRR until they resume. If the trend card is empty, no month-end snapshot has been captured yet; it appears after the first full month.
| On this screen | What it does |
|---|---|
| MRR | The sum of active schedules normalized to a month, with the annual run-rate beside it. |
| Active subscriptions | How many schedules are billing. |
| New this month / Churned this month | Schedules started and ended since the first of the month. |
| Net new MRR | New minus churned, with the churn rate as a percent. |
| MRR trend | The 12-month chart. This month shows new, churned, and net beneath it. |
What subscribers see
The subscriber's own page and card updates.
The subscriber's self-serve page
Subscribers get their own secure page, reached from the Manage subscription button in any plan email, with no login; the secure link is the key. It shows the plan amount, interval, next charge date, and status, and lists their full invoice history with you, each invoice one tap from its own pay page.
They can pause, resume, or cancel from that page, and update their payment card (see the next section). Anything they do shows on your Recurring board right away and is logged on the customer's timeline.
If a subscriber says the link does not work, resend any plan email or open the schedule and copy the manage link for them. If you do not want subscribers to cancel themselves, tell them to contact you; the page follows your plan's terms.
| On this screen | What it does |
|---|---|
| Manage subscription | The button in plan emails that opens the subscriber's page. |
| Plan summary | Amount, interval, next charge date, and status. |
| Pause / Resume / Cancel | The subscriber's own controls, mirrored on your board. |
| Invoice history | Every invoice with you, each opening its pay page. |
| Update payment card | Replaces the card on the subscription. On a past-due plan it retries the overdue charge at once. |
Do this with the API:Subscriptions
When a subscriber's card changes (self-serve card update)
Cards expire, get reissued, and get replaced after fraud, and every one of those used to mean a phone call to you. Now the subscriber fixes it themselves: their self-serve page has an Update payment card section, and every dunning email links straight to it.
On an up-to-date plan, the new card simply takes over from the next cycle. On a past-due plan, the form is already open with a Save card & retry payment button: saving the card immediately retries the overdue charge, and on approval the subscription reactivates on the spot, with no action from you and no gap in service.
Done looks like this: the schedule returns to Active on your board, the recovered charge appears in Transactions, the old card is retired in the vault, and every other plan, autopay enrollment, or installment plan that used the old card switches to the new one.
If you would rather send the link yourself, use Send update link on the Expiring cards panel under Saved cards, or Copy link and text it. If the retry declines on the new card too, the plan stays Past due and the customer sees the reason on the page.
- 1The subscriber opens their subscription page from any plan email (the Manage subscription button) – no login, the secure link is the key.
- 2They tap Update payment card and enter the new card.
- 3On an up-to-date plan, the new card simply takes over from the next cycle.
- 4On a past-due plan, the form is already open with a Save card & retry payment button: saving the card immediately retries the overdue charge, and on approval the subscription reactivates on the spot – no action from you, no gap in service.
| On this screen | What it does |
|---|---|
| Update payment card | On the subscriber's page. Opens the card form. |
| Save card & retry payment | On a past-due plan. Saves the card, retries the overdue charge, and reactivates the subscription on approval. |
| Save card | On an active plan. The new card takes over from the next cycle. |
| Send update link / Copy link | On Saved cards → Expiring cards: emails the customer the secure update page, or copies it to text or read out. |